
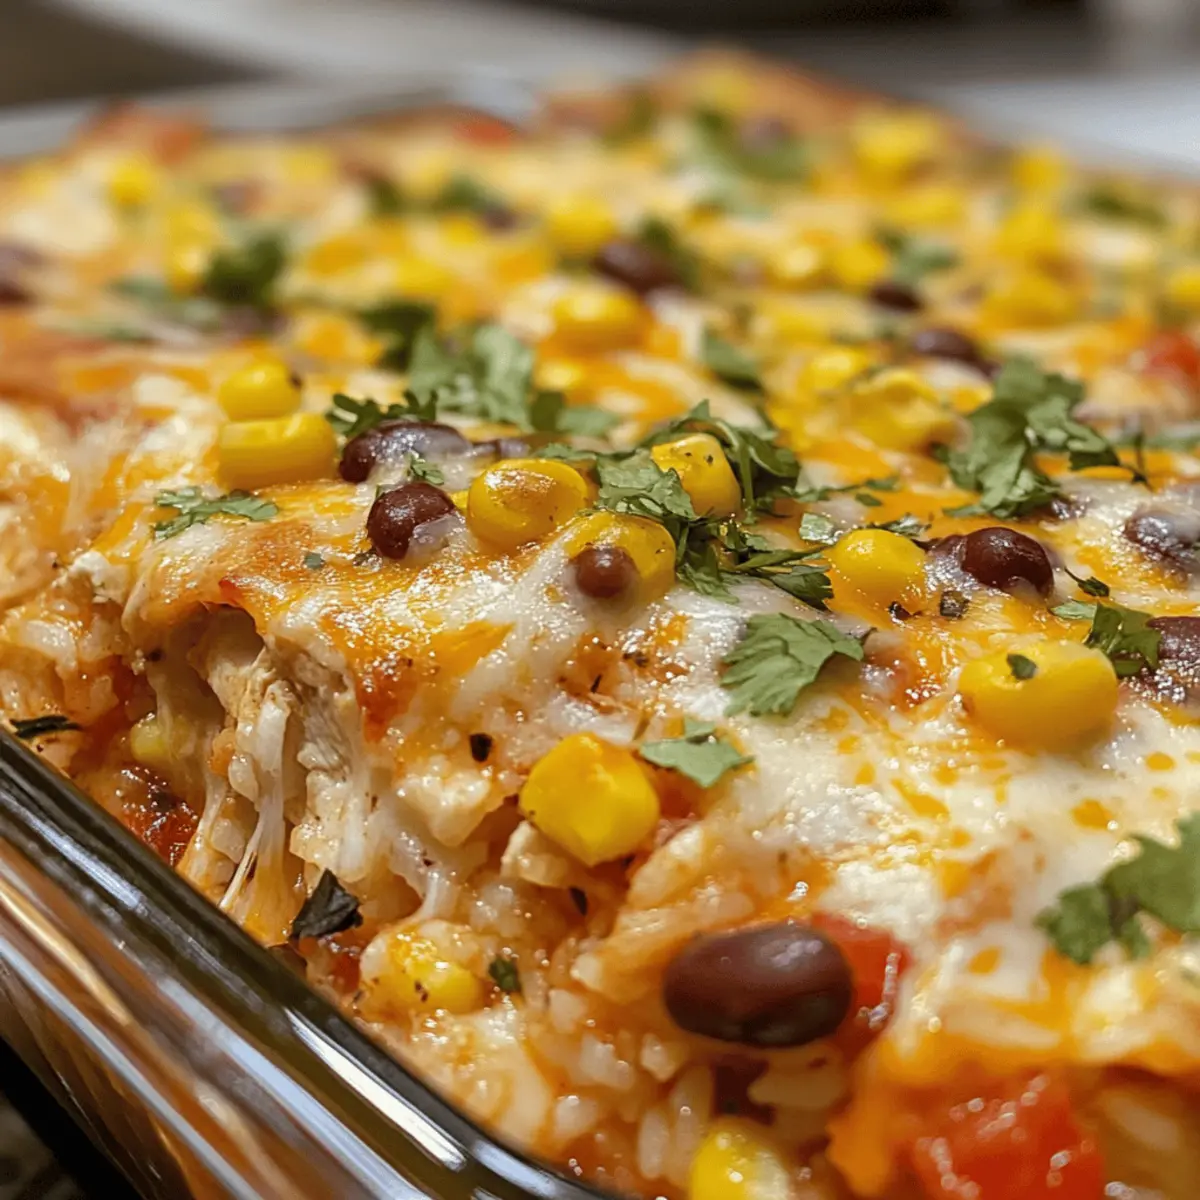
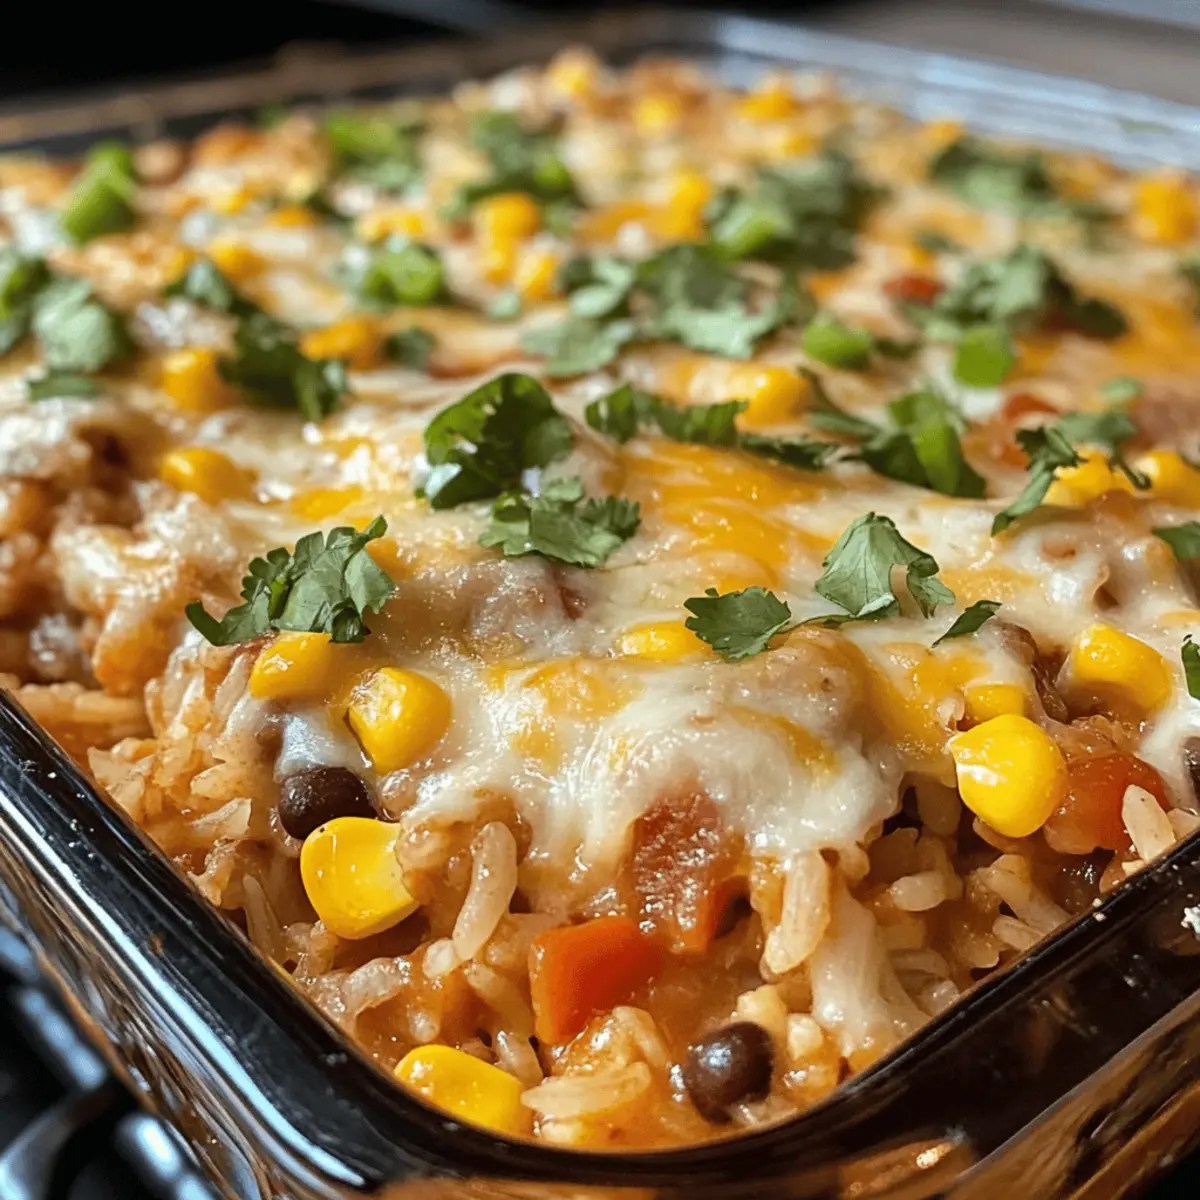
As I pulled the bubbling Chicken Burrito Casserole from the oven, the aroma enveloped my kitchen like a warm hug. This dish brings together everything you adore about burritos but in a hassle-free, one-pan format that’s perfect for those busy weeknights. Packed with tender rice, juicy shredded chicken, and vibrant veggies, it’s a meal that’ll have your family singing your praises. Not only is this casserole a crowd-pleaser, but it’s also a fantastic option for meal prep, ensuring you have hearty servings ready for the week ahead. Plus, with the ability to swap ingredients to fit your cravings or dietary needs, the cooking possibilities are endless! Are you ready to dive into this comforting culinary delight?

Why is Chicken Burrito Casserole a Game Changer?
Ease of Preparation: This dish combines all the flavorful components of burritos into a single, one-pan meal, minimizing cleanup and hassle.
Customizable Options: With numerous variations, you can easily swap in your favorite proteins and vegetables, making it perfect for meal prep and diverse family tastes.
Comforting Flavors: The hearty blend of rice, chicken, and spices creates a cozy ambiance, offering satisfaction in every bite—just like your favorite burrito!
Time-Saver: Baking while you relax allows you to enjoy meal time without stress, making it ideal for busy weeknights.
Perfect for Meal Prep: This casserole can be stored for later, so you can enjoy it multiple times throughout the week, just like in the Chicken Spaghetti Casserole or Chicken Cauliflower Casserole.
Kid-Friendly Appeal: Its cheesy top and delicious flavors make it a surefire hit with kids and adults alike, ensuring everyone leaves the table satisfied!
Chicken Burrito Casserole Ingredients
A delicious blend for flavor-packed meals!
For the Casserole
• Dry Long-Grain White Rice – Provides the foundational texture; feel free to substitute with brown rice or quinoa for a nuttier flavor.
• Corn Kernels – Adds a delightful sweetness; use frozen or fresh corn based on what you have on hand.
• Cooked Chicken – The star protein that keeps it hearty; leftovers work great, or try canned chicken for convenience.
• Chicken Broth – Infuses moisture and deep flavor; vegetable broth is a lovely alternative if you prefer a vegetarian option.
For the Seasoning
• Chili Powder – Essential for that classic burrito flavor; adjust according to your spice tolerance!
• Cumin – Lends a warm, earthy tone that elevates the dish; a little goes a long way.
• Oregano – Offers a hint of freshness; use dried or fresh as per your preference.
• Garlic Powder – A must for depth of flavor; fresh minced garlic can be a great substitute!
• Salt – Enhances all the other flavors; taste towards the end and add as needed.
For Topping
• Monterey Jack Cheese – Melts beautifully and adds a creamy finish; consider cheddar or a dairy-free alternative for those with dietary restrictions.
Step‑by‑Step Instructions for Chicken Burrito Casserole
Step 1: Preheat the Oven
Begin by preheating your oven to 400°F (200°C). This ensures an even bake for your Chicken Burrito Casserole, allowing the flavors to meld beautifully while the dish cooks. An oven thermometer can help confirm the temperature, ensuring your dish comes out perfectly every time.
Step 2: Combine Ingredients
In a large baking dish, mix together the dry long-grain white rice, corn kernels, cooked chicken, chicken broth, and spices. Stir thoroughly to ensure that everything is evenly distributed. The rice will act as the base, soaking up all those tasty flavors as it cooks, so make sure to break up any clumps while mixing.
Step 3: Cover the Casserole
Once the ingredients are combined, cover the baking dish tightly with aluminum foil. This step is crucial to keep the moisture in, allowing the rice to cook properly while absorbing the flavorful broth. It should be fitted snugly to prevent steam from escaping during the cooking process.
Step 4: Bake the Casserole
Place the covered casserole in the preheated oven and bake for about 50 to 60 minutes. You’ll know it’s ready when the rice is tender and the broth is mostly absorbed, creating a deliciously creamy texture. It’s a good idea to check the dish halfway through and add a splash of broth if it looks dry.
Step 5: Add Cheese and Finish Baking
After baking, remove the foil and sprinkle a generous layer of Monterey Jack cheese over the top. Return the casserole to the oven for an additional 5 to 10 minutes, or until the cheese is melted and bubbly. The golden cheese topping adds a delightful richness to your Chicken Burrito Casserole.
Step 6: Cool and Serve
Once done, take the casserole out of the oven and let it cool slightly before serving. Allowing it to rest for a few minutes not only makes it easier to dish up but also helps the flavors meld together beautifully. Serve hot and enjoy the comforting goodness of your Chicken Burrito Casserole!
Expert Tips for Chicken Burrito Casserole
• Use Uncooked Rice: Ensure you add dry rice, as using cooked rice can lead to a soupy consistency, ruining the texture.
• Cover Tightly: Don’t skip the foil cover during baking; it locks in moisture, allowing the rice to cook properly and absorb all the flavors.
• Oven Accuracy: Keep an eye on your oven’s accuracy. If it runs cooler or hotter, adjust the cooking time accordingly to ensure the casserole is perfectly done.
• Flavor Adjustments: Feel free to tweak the spices based on your family’s taste preferences. Just remember to maintain the essence of your Chicken Burrito Casserole!
• Don’t Rush Cooling Time: Let the casserole cool for a few minutes before serving. This helps the dish set and makes serving easier while enhancing the flavors.
• Leftover Magic: Make the most of leftovers! Store in an airtight container for up to 5 days or freeze for quick meals later in the week.
Make Ahead Options
These Chicken Burrito Casserole preparations are perfect for meal prep enthusiasts! You can chop and combine all the ingredients (except for the cheese) up to 24 hours in advance. Simply store the mixture in an airtight container in the refrigerator until you’re ready to bake. This not only saves time but ensures that the flavors have time to meld. When you’re ready to enjoy your delicious casserole, transfer the mixture to a baking dish, cover with foil, and bake for about 50 to 60 minutes. For the finishing touch, remove the foil, sprinkle on the cheese, and bake for an additional 5 to 10 minutes. Your family will appreciate the convenience and the scrumptiousness of a just-as-delicious, home-cooked meal!
Storage Tips for Chicken Burrito Casserole
Fridge: Store leftovers in an airtight container for up to 5 days. This helps maintain freshness while making it easy to grab for quick meals!
Freezer: Portion out the casserole into freezer-safe containers and freeze for up to 3 months. Perfect for meal prep, just thaw overnight in the fridge before reheating.
Reheating: When ready to enjoy, reheat your Chicken Burrito Casserole at 350°F until warmed through, about 20-25 minutes. Add a splash of broth if it seems dry!
Room Temperature: Avoid leaving the casserole out for more than 2 hours to ensure food safety. Enjoy your flavorful meal without worry!
Variations & Substitutions for Chicken Burrito Casserole
Feel free to get creative with your Chicken Burrito Casserole – the possibilities are as endless as your cravings!
-
Brown Rice: Substitute white rice with brown rice for added fiber, adjusting cooking time slightly for perfect texture.
-
Ground Beef: Swap cooked chicken for seasoned ground beef for a delightful twist; it adds a rich, hearty flavor kids will love.
-
Vegetarian Option: Replace the chicken with a can of black beans or extra veggies for a fully plant-based meal that doesn’t skimp on flavor.
-
Spicy Kick: Add diced jalapeños or a pinch of cayenne pepper if you want to spice things up, elevating the whole dish to adventure status.
-
Creamy Addition: Stir in a can of cream of mushroom soup before baking for a creamy, comforting touch that reminds you of classic casseroles.
-
Herb Boost: Mix in fresh cilantro or parsley before serving to brighten up the flavors. Fresh herbs can truly elevate the dish, enhancing the overall experience.
-
Cheese Alternatives: If dietary restrictions are in play, try a dairy-free cheese alternative that melts well or opt for a sprinkle of nutritional yeast for a cheesy flavor.
-
Salsa Topping: Top the baked casserole with fresh salsa or guacamole just before serving for a pop of freshness that complements the warm, cheesy goodness beneath.
Don’t forget to explore more comforting recipes like Cowboy Butter Chicken or the delicious Cheesy Chicken Crescent for even more meal inspiration!
What to Serve with Chicken Burrito Casserole?
A delightful array of sides can transform your Chicken Burrito Casserole into a memorable family meal, bursting with color and flavor.
-
Tortilla Chips: Crunchy and salty, they offer a perfect texture contrast to the creamy casserole. Pair them with guacamole or salsa for double the flavor fun.
-
Fresh Salsa: Bright and tangy, this adds a zesty punch and freshness to each bite, complementing the rich flavors of the casserole beautifully.
-
Mexican Street Corn Salad: This vibrant salad brings sweet, smoky, and creamy elements that enhance the burrito experience, making it a great sidekick.
-
Avocado Slices: Creamy avocado balances the spiciness, inviting a refreshing contrast between the warm casserole and cool avocado.
-
Garden Salad: A light, crisp salad with a tangy vinaigrette can cleanse the palate and offer a refreshing twist, rounding out the meal nicely. It’s also a nutritious addition!
-
Margaritas: A refreshing drink, the citrusy flavors of margaritas are a delightful match, elevating your dining experience while keeping it festive.
-
Chocolate Brownies: End the meal on a sweet note with fudgy brownies; their richness creates a delicious finale that your family will love.
Chicken Burrito Casserole Recipe FAQs
How do I choose the right rice for Chicken Burrito Casserole?
Absolutely! Dry long-grain white rice is perfect for this dish because it provides a fluffy texture. If you want a nuttier flavor, you can opt for brown rice or quinoa, but be sure to adjust the cooking times—brown rice typically needs about 10-15 extra minutes.
What’s the best way to store leftovers of Chicken Burrito Casserole?
You’ll want to store any leftovers in an airtight container in the fridge, where they can last for up to 5 days. This makes it super convenient for quick meals throughout the week. Just remember to let the casserole cool completely before sealing it up!
Can I freeze Chicken Burrito Casserole? How?
Yes, you can! I recommend portioning the casserole into freezer-safe containers. It will last up to 3 months in the freezer. When you’re ready to enjoy it again, simply thaw it overnight in the fridge, then reheat in the oven at 350°F until warmed through, about 20-25 minutes. If it seems dry, just add a splash of broth!
What if my Chicken Burrito Casserole is too soupy after baking?
Very! If you find your casserole is soupy, don’t worry! This can happen if too much liquid is added or if cooked rice was mistakenly used. To remedy this, simply return it to the oven uncovered for an additional 10-15 minutes. This extra baking time will help absorb the excess moisture and enhance flavor concentration.
Are there any dietary considerations for making Chicken Burrito Casserole?
Absolutely! If you’re catering to dietary restrictions, you can substitute chicken broth with vegetable broth for a vegetarian option. Additionally, if anyone has lactose intolerance, Monterey Jack cheese can be replaced with a dairy-free cheese alternative. It’s great to see how flexible this recipe can be, accommodating various needs!

Delicious Chicken Burrito Casserole for Cozy Family Nights
Ingredients
Equipment
Method
- Preheat your oven to 400°F (200°C) to ensure even baking.
- In a large baking dish, mix together the rice, corn, chicken, broth, and spices thoroughly.
- Cover the baking dish tightly with aluminum foil to retain moisture.
- Bake the covered casserole in the preheated oven for 50 to 60 minutes until the rice is tender.
- Remove the foil, add the cheese on top, and return to the oven for 5 to 10 minutes until melted.
- Let the casserole cool slightly before serving to enhance flavors.
Leave a Reply