
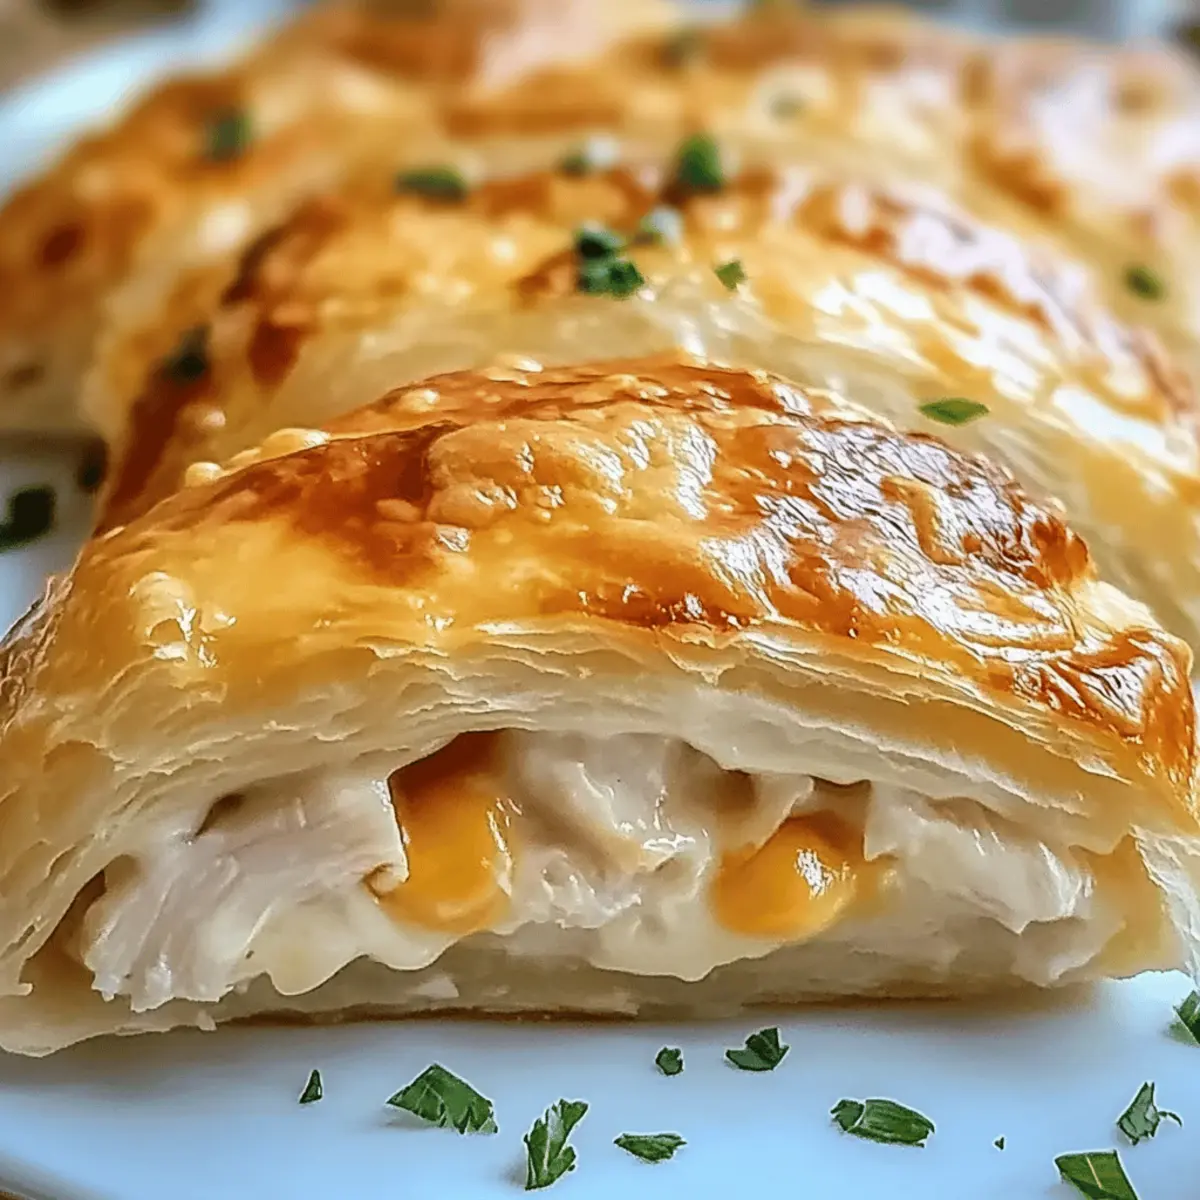
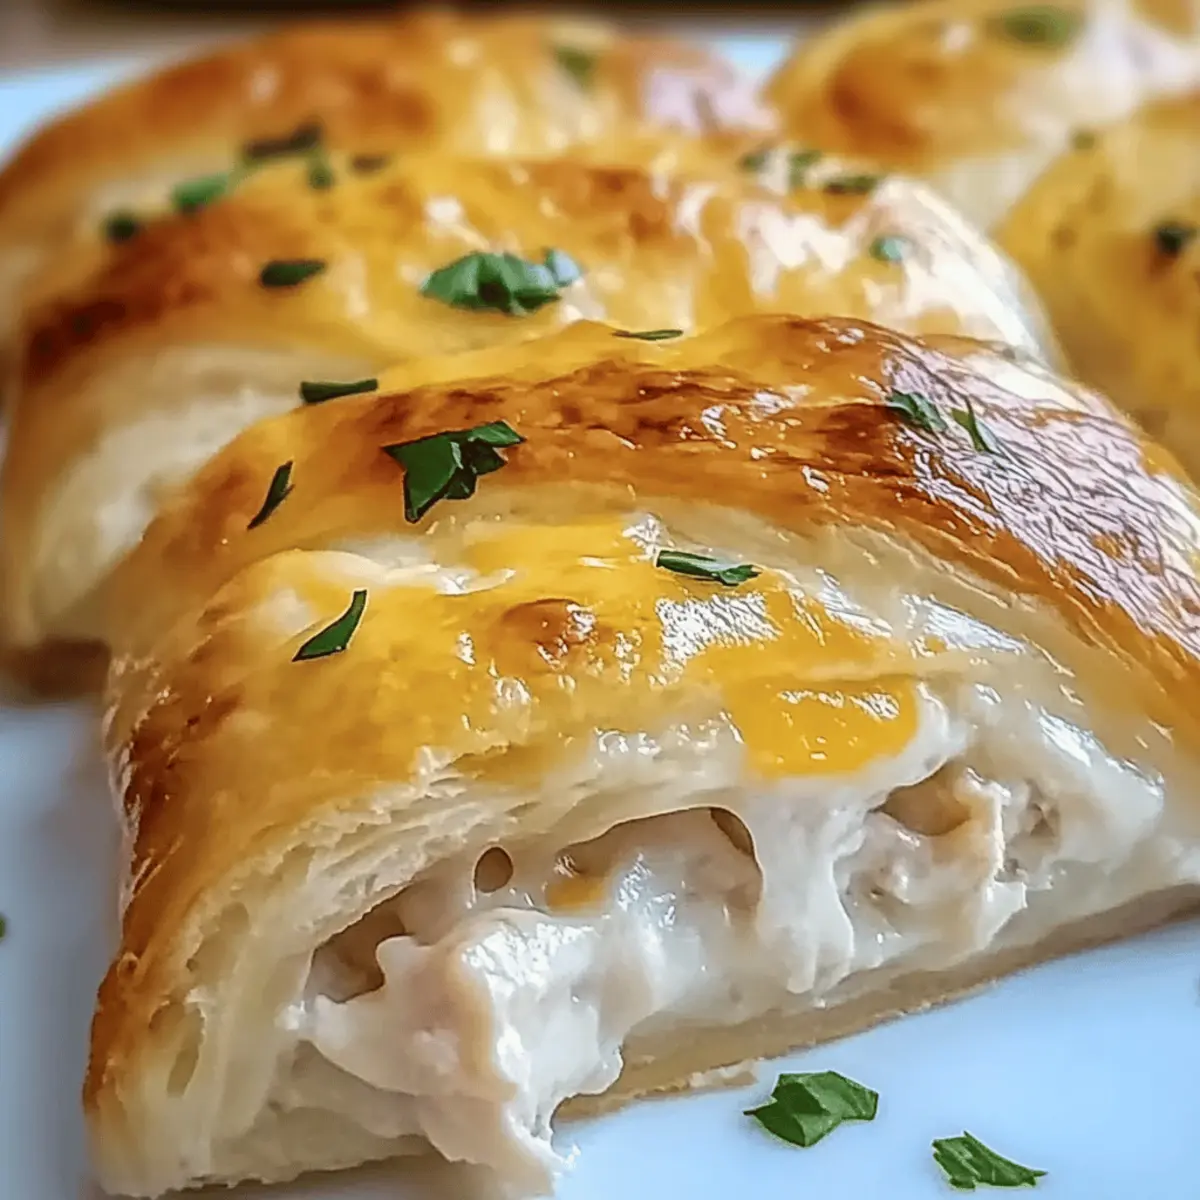
As the tantalizing aroma of freshly baked rolls wafts through your kitchen, it’s impossible not to feel a sense of comfort and joy. Today, I’m excited to share my recipe for Cheesy Chicken Crescent Rolls, the perfect solution for those busy weeknights or cozy gatherings with friends. These delightful bundles are not only super easy to whip up in just 30 minutes, but they also offer endless customization options. Whether you want to add a touch of spinach for a nutritious twist or experiment with different cheeses, these rolls will be a sure hit. Ideal for impressing guests or simply enjoying a homemade feast, you’ll find them satisfying for both your taste buds and your schedule. Curious to see how simple it is to create these little pockets of goodness? Let’s dive in!

Why Are Cheesy Chicken Crescent Rolls Amazing?
Simple yet Impressive: The ease of making these rolls means you can quickly impress family or guests without spending hours in the kitchen.
Endless Customization: Mix and match fillings—add spinach, jalapeños, or even different cheeses like feta for unique versions!
Crowd-Pleasing Flavor: The gooey cheese and savory chicken are a comforting combination that everyone will love.
Perfect for Any Occasion: Whether it’s a weeknight dinner or a party appetizer, these rolls fit right in.
Quick Prep Time: With only 15 minutes of prep and 30 minutes from start to finish, you’ll be enjoying fresh rolls in no time!
For more tasty ideas, check out my Cheesy Chicken Wrap or luxurious Ooey Gooey Cheesy Garlic Chicken. Enjoy!
Cheesy Chicken Crescent Rolls Ingredients
For the Filling
- Shredded Cooked Chicken – This is the main protein; feel free to use leftover chicken or a rotisserie for added convenience.
- Cream Cheese – It adds a rich creaminess; you can substitute it with ricotta for a lighter taste.
- Shredded Cheddar Cheese – Offers a delicious flavor and gooey texture; try mozzarella for an even stretchier roll.
- Garlic Powder – Enhances the overall flavor; fresh minced garlic can provide a more robust taste.
- Chopped Fresh Parsley – Adds freshness and vibrant color; dried herbs can be used as a substitute in a pinch.
- Salt and Pepper – Essential for seasoning; adjust to your taste buds for the perfect flavor balance.
For the Dough
- Crescent Roll Dough – Creates that flaky exterior we all love; consider using puff pastry or biscuit dough as alternatives.
Try these Cheesy Chicken Crescent Rolls as your go-to comfort food—they’re quick, satisfying, and endlessly adaptable!
Step‑by‑Step Instructions for Cheesy Chicken Crescent Rolls
Step 1: Preheat the Oven
Begin by preheating your oven to 375°F (190°C). While it warms up, take a moment to grease a baking sheet with a little oil or cooking spray to prevent the Cheesy Chicken Crescent Rolls from sticking. This initial step ensures even baking and a lovely golden color for your rolls.
Step 2: Prepare the Filling
In a mixing bowl, combine the shredded chicken, cream cheese, shredded cheddar, garlic powder, chopped parsley, salt, and pepper. Stir well until the mixture is smooth and creamy, creating a delightful filling for your rolls. This should take about 3-5 minutes and results in a deliciously savory blend that will complement the flaky dough beautifully.
Step 3: Unroll the Crescent Dough
Next, carefully unroll the crescent roll dough on a clean surface. Take your time cutting the dough into triangles, ensuring each piece is uniform. This helps the Cheesy Chicken Crescent Rolls cook evenly. Lay them out flat, with the wider end facing you, to prepare for filling.
Step 4: Fill and Roll the Dough
Place a spoonful of the chicken mixture at the wide end of each triangle. Gently roll the dough toward the pointed end, tucking in the sides to secure the filling inside. Make sure not to overfill; this will help prevent any bursts while baking. Each roll should look neat and compact, ready for the oven.
Step 5: Bake to Perfection
Arrange the filled rolls point-side down on your prepared baking sheet, ensuring they have enough space to puff up while baking. Slide the baking sheet into the preheated oven and bake for 12-15 minutes. Keep an eye on them until they turn a lovely golden brown; this indicates they are cooked through and perfectly flaky.
Step 6: Cool and Serve
Once the Cheesy Chicken Crescent Rolls are out of the oven, allow them to cool for a few minutes. This step is crucial for letting the cheese settle slightly, making them easier to handle. Serve these warm, perhaps alongside your favorite dipping sauces for an extra treat. Enjoy the comforting flavors you’ve just created!
Expert Tips for Cheesy Chicken Crescent Rolls
- Keep Dough Cold: Ensure your crescent roll dough remains chilled until you’re ready to use it. Warm dough can become sticky and difficult to work with.
- Don’t Overfill: Avoid the urge to pack too much filling into each roll, as this can cause them to burst during baking. Stick to a tablespoon for filling!
- Use Fresh Ingredients: Whenever possible, opt for fresh parsley and cooked chicken for the best flavor in your Cheesy Chicken Crescent Rolls.
- Check Doneness: Keep an eye on the rolls towards the end of baking. They should be golden brown when done, which is a good sign that the filling is hot and bubbly too.
- Experiment with Fillings: Don’t hesitate to customize your Cheesy Chicken Crescent Rolls! Adding ingredients like spinach, peppers, or different cheeses can elevate the flavor.
Storage Tips for Cheesy Chicken Crescent Rolls
Room Temperature: Allow the rolls to cool completely, then store them in a covered container at room temperature for up to 2 days.
Fridge: Refrigerate leftover Cheesy Chicken Crescent Rolls in an airtight container for 3-4 days to maintain freshness and flavor.
Freezer: For longer storage, freeze assembled rolls for 2-3 months. Place them in a single layer on a baking sheet before transferring to a freezer-safe bag or container.
Reheating: To reheat, bake frozen Cheesy Chicken Crescent Rolls directly from the freezer at 375°F (190°C) for about 15-20 minutes, or until heated through and golden.
Make Ahead Options
These Cheesy Chicken Crescent Rolls are fantastic for meal prep, allowing you to save time on busy weeknights! You can assemble the rolls and refrigerate them for up to 24 hours before baking, keeping them covered to maintain moisture and freshness. Additionally, if you’re prepping for a longer period, you can freeze the assembled rolls for 2-3 months. Just place them on a baking sheet to freeze individually, then store them in airtight bags. When you’re ready to enjoy, bake them straight from the freezer, adding a few extra minutes to the baking time. This way, you’ll have delicious, homemade rolls that are just as tasty as fresh—perfect for any occasion!
What to Serve with Cheesy Chicken Crescent Rolls
As you prepare to indulge in these golden bites of goodness, consider how to elevate your meal experience with complementary sides and flavors.
- Creamy Mashed Potatoes: The buttery richness and smooth texture balance the flaky rolls, making for a comforting duo. The warmth of the potatoes will enhance every bite of the cheesy goodness.
- Fresh Garden Salad: Crisp greens tossed with a tangy vinaigrette provide a refreshing contrast to the savory rolls. This adds a burst of freshness that perfectly complements the richness of the filling.
- Garlic Aioli: A delightful dipping sauce that adds a creamy, garlicky kick. The zesty flavor pairs beautifully with each cheesy bite, taking your rolls to a whole new level.
- Roasted Vegetables: Seasoned medley of carrots, bell peppers, and zucchini deliver a satisfying crunch and earthy flavor; perfect for a rustic, wholesome meal.
- Ranch Dressing: Classic and crowd-pleasing, ranch offers a cool and creamy contrast that enhances the savory filling of the rolls. Perfect for those with a penchant for dipping!
- Spicy Marinara Sauce: The zesty acidity of marinara creates a dynamic flavor pairing; perfect to dip your rolls in and let that cheesy goodness shine even more.
- Sparkling Lemonade: A refreshing drink with a hint of citrus balances the hearty flavors of the rolls. The bubbles and brightness bring life to your meal.
- Chocolate Chip Cookies: To finish off your family feast on a sweet note, serve warm cookies that create a delightful contrast with the savory rolls, rounding out a satisfying meal.
For a little extra comfort on a cozy night, serve the Cheesy Chicken Crescent Rolls alongside your favorite dipping sauces and experiences!
Cheesy Chicken Crescent Rolls Variations
Explore a world of flavors with these delightful twists on classic Cheesy Chicken Crescent Rolls. Each suggestion invites your creativity in the kitchen!
- Dairy-Free: Use dairy-free cream cheese and cheeses to create a lactose-free version that everyone can enjoy.
- Spicy Kick: Add diced jalapeños or red pepper flakes for a zesty touch that will awaken your taste buds.
- Nutritious Greens: Incorporate cooked spinach or kale for a healthy boost without sacrificing flavor; it pairs beautifully with the creamy filling.
- Vegetarian Option: Swap out chicken for shredded vegetables like zucchini or carrots for a fresh, veggie-packed alternative. This will make for a colorful and tasty roll!
- Herby Infusion: Mix in different herbs like thyme or basil instead of parsley for a fresh herbaceous flavor that dances on your palate.
- Flavorful Cheeses: Experiment with gouda or pepper jack for a unique twist, adding depth and a touch of spice to the rolls.
- Savory Sausage: Substitute the chicken with crumbled cooked sausage for a heartier roll that’s full of flavor.
- Pesto Swirl: Spread a thin layer of pesto on the crescent dough before adding the filling for an aromatic and delicious enhancement that elevates each bite.
Feel free to play around with these ideas! For inspiration, you might also want to check out my Cheesy Chicken Spaghetti or the comforting Cheesy Chicken Potatoes for even more mouthwatering twists!

Cheesy Chicken Crescent Rolls Recipe FAQs
What kind of chicken can I use for the filling?
Absolutely! You can use shredded cooked chicken from a rotisserie, left over from another meal, or even poached chicken breast. I often recommend using rotisserie chicken for its flavor and convenience—just shred it and mix it right in!
How should I store leftover Cheesy Chicken Crescent Rolls?
For the best taste, allow the rolls to cool completely before placing them in an airtight container. They can stay fresh in the fridge for about 3-4 days. If you have any left, I highly recommend enjoying them within that timeframe for the best flavor!
Can I freeze Cheesy Chicken Crescent Rolls?
Absolutely, you can freeze them! To do this, assemble the rolls but do not bake them. Place them on a baking sheet in a single layer and freeze until firm. Then, transfer them to a freezer-safe bag. They can be stored for up to 2-3 months. When you’re ready to enjoy, just bake them directly from frozen at 375°F (190°C) for 15-20 minutes!
What should I do if the rolls burst during baking?
No worries, it happens! If this occurs, it’s usually due to overfilling. For next time, try using a tablespoon of filling per roll to avoid this issue. If they do burst, simply serve them as open-faced rolls—still delicious!
Are Cheesy Chicken Crescent Rolls suitable for people with gluten allergies?
For a gluten-free option, I recommend substituting the crescent roll dough with gluten-free biscuit dough or puff pastry. Just ensure that any other ingredients are gluten-free, especially the chicken broth if using any in the mix.
What can I use instead of cream cheese?
If you want a lighter alternative, ricotta cheese works beautifully and adds a lovely creaminess as well. You can also try Greek yogurt for a tangy kick! Adjust the seasoning as needed to balance flavors.
Cheesy Chicken Crescent Rolls: Quick Comfort Food Heaven
Ingredients
Equipment
Method
- Preheat your oven to 375°F (190°C) and grease a baking sheet.
- In a mixing bowl, combine shredded chicken, cream cheese, cheddar, garlic powder, parsley, salt, and pepper until smooth.
- Unroll and cut the crescent dough into triangles on a clean surface.
- Place a spoonful of the chicken mixture at the wide end of each triangle and roll towards the pointed end.
- Arrange the rolls point-side down on the baking sheet and bake for 12-15 minutes until golden brown.
- Allow to cool for a few minutes before serving warm.
Leave a Reply