
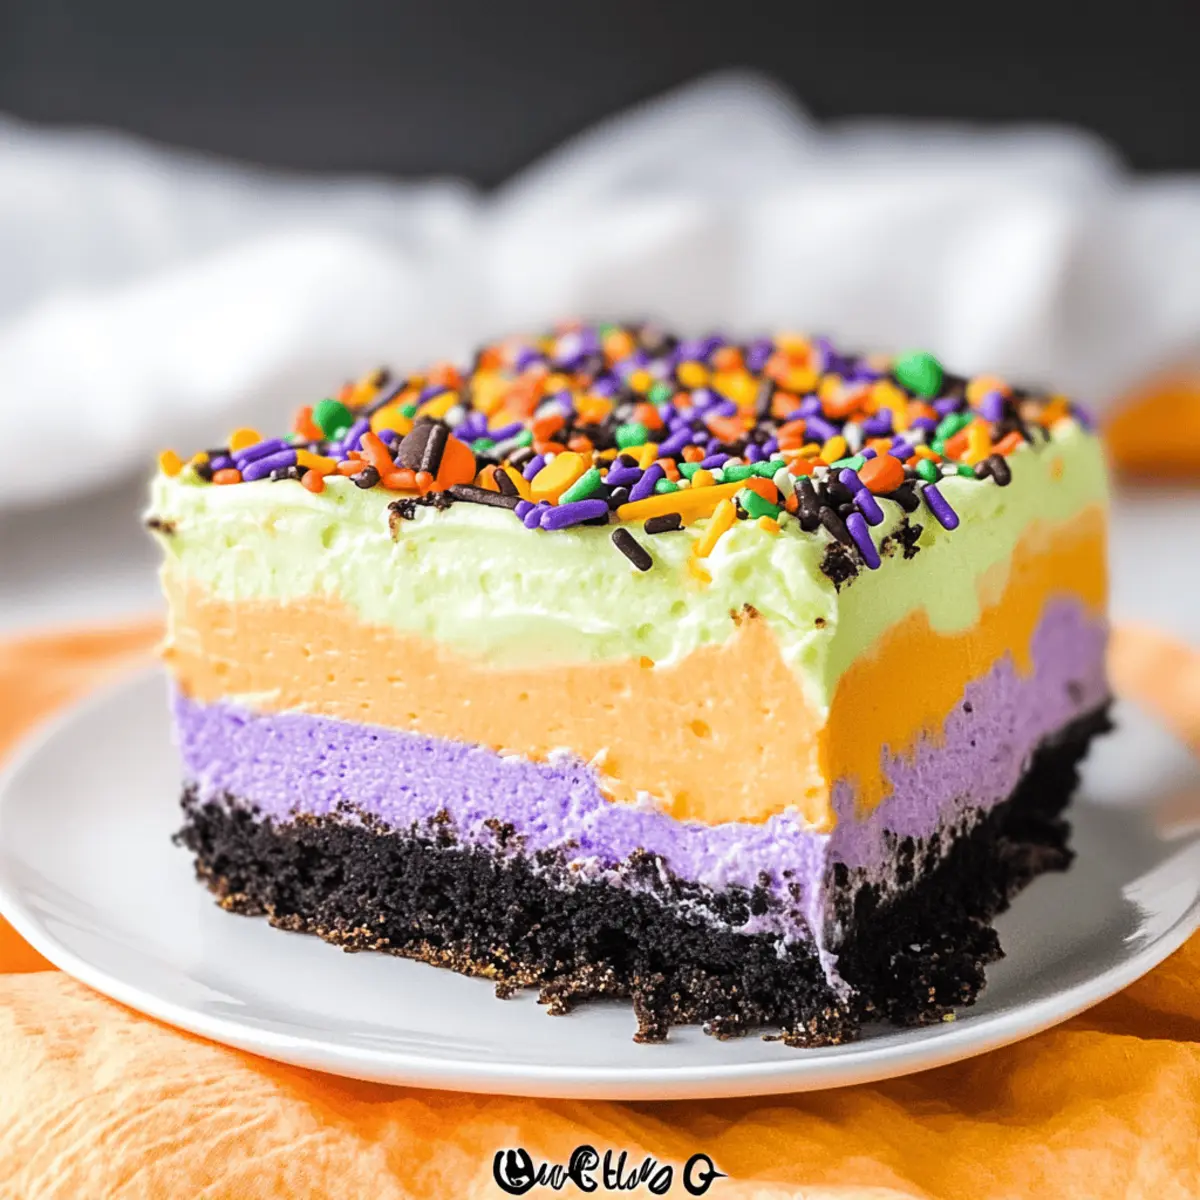
As the haunting melodies of Halloween draw near, I’m reminded of a delightful surprise that never fails to charm—our Halloween Lush recipe! This no-bake dessert whisks you away into a whimsical world with its enchanting layers of chocolate cookie crust, creamy cheesecake, and vibrantly colored pudding. Not only is it incredibly easy to whip up, but it’s also a showstopper that brings joy to both kids and adults alike. Picture a dessert that looks as festive as it tastes, perfect for any gathering. With its festive appeal and creamy indulgence, this treat will have everyone clamoring for more. Curious about how to create this layered masterpiece? Let’s dive into the recipe!
Why is Halloween Lush a Must-Try?
Irresistible Treat: This Halloween Lush dessert is sure to steal the spotlight at any gathering, with its vibrant colors and indulgent layers delighting both kids and adults alike.
No-Bake Wonder: Save time and hassle—this no-bake recipe allows you to create a stunning dessert without turning on the oven.
Versatile Flavors: Feel free to substitute flavors; swap the orange gelatin or experiment with different cookie bases like gingersnaps for your unique spin!
Quick Assembly: With simple steps that anyone can follow, from novice cooks to seasoned chefs, this treat is both approachable and rewarding.
Crowd-Pleasing Appeal: Serve it at parties, potlucks, or family gatherings; this colorful delight is bound to impress everyone, alongside other favorites like Halloween Chocolate Chip cookies!
Enjoy the spirit of the season as you whip up this delightful Halloween Lush—your guests will be back for seconds!
Halloween Lush Recipe Ingredients
For the Crust
- Chocolate Sandwich Cookies – The crunchy base adds texture; feel free to swap with graham crackers for a different flavor.
- Butter – Binds the cookie crumbs together; using unsalted butter ensures balanced flavors.
For the Pudding Layers
- Orange Gelatin – Adds vibrant color and a fruity kick; experiment with different flavored gels for a fun twist.
- Boiling Water – Ensures smooth integration of gelatin; don’t skip this step!
- Vanilla Instant Pudding – Creates a creamy layer; using chocolate pudding will deepen the dessert’s richness.
- Cold Milk – Hydrates and sets the pudding; whole milk gives a creamier texture, but dairy-free options work too.
For the Cream Cheese Layer
- Cream Cheese – Offers a rich, creamy texture; ensure it’s softened for easy blending.
- Powdered Sugar – Sweetens the cream cheese mix; consider a sugar substitute for a healthier option.
For the Toppings
- Whipped Topping – Adds lightness and a fluffy texture; homemade whipped cream enhances freshness.
- Food Coloring (Green & Purple) – Brightens the dessert; purely optional but visually family-pleasing!
- Halloween Sprinkles – Decorates the dessert fun and festively; use your favorite themed sprinkles for a delightful finish.
With this Halloween Lush recipe, you’re one step closer to creating a festive treat that’s sure to impress!
Step‑by‑Step Instructions for Halloween Lush Recipe
Step 1: Prepare the Crust
Begin by crushing the chocolate sandwich cookies in a food processor until they resemble fine crumbs. Melt the unsalted butter and mix it with the cookie crumbs until well combined. Press this mixture firmly into the bottom of a 9×13 dish, forming an even crust. Set aside while you prepare the next layer.
Step 2: Prepare Gelatin
In a small bowl, whisk together the orange gelatin and boiling water until fully dissolved, which should take about 2 minutes of stirring. Allow this mixture to cool slightly before moving on. Its vibrant color will add a fun layer to your Halloween Lush, so make sure it’s mixed thoroughly.
Step 3: Pudding Layer
In a medium mixing bowl, combine the vanilla instant pudding mix with 2 cups of cold milk. Whisk vigorously for about 2 minutes until the pudding thickens. Once thickened, gently stir in the prepared orange gelatin, ensuring everything is smooth and well blended. This colorful mixture will be the next layer of your Halloween Lush!
Step 4: Cream Cheese Layer
In a large bowl, use a mixer to beat the softened cream cheese and powdered sugar together until smooth, which should take around 2-3 minutes. Once well blended, fold in 2 cups of whipped topping with a spatula to maintain its lightness. Add green food coloring to reach your desired hue, then spread this creamy layer over the cookie crust evenly.
Step 5: Add Gelatin Mixture
Carefully pour the prepared orange pudding mixture over the cream cheese layer. Use a spatula to spread gently, ensuring that you don’t disturb the cream cheese layer. The vibrant orange layer will create a delightful contrast against the creamy white, adding to the festive look of your Halloween Lush.
Step 6: Top with Whipped Topping
In a small bowl, mix the remaining whipped topping with purple food coloring until you achieve your desired shade. Spread this purple topping over the orange layer, smoothing it out for an even finish. Finally, sprinkle your Halloween sprinkles generously on top—these little touches will enhance the festive aesthetic of your dessert.
Step 7: Chill
Cover the dish with plastic wrap and refrigerate the Halloween Lush for at least 4 hours, or until set. This chilling time allows the layers to firm up and unite in flavor. When ready, slice into squares and serve chilled, enjoying the cheerful layers and unbeatable taste!
Make Ahead Options
These Halloween Lush preparations are perfect for busy home cooks looking to save time during the festive season! You can prepare the crust with chocolate sandwich cookies and butter up to 24 hours ahead—just store it tightly wrapped in the refrigerator to maintain its crunchiness. Additionally, the cream cheese layer can be made and refrigerated for up to 3 days. When you’re ready to serve, simply layer on the pudding mixture, follow with the whipped topping, and allow it to chill for another 4 hours. This way, the flavors meld beautifully, and you’ll still enjoy a just-as-delicious treat without last-minute stress!
What to Serve with Halloween Lush?
Looking to create the perfect spooky spread alongside your delightful Halloween Lush? Here are some tasty options that will complete your festive feast!
-
Pumpkin Spice Bread: This moist bread echoes the autumn spirit with its warm spices and pairs wonderfully with the creamy layers of your dessert.
-
Caramel Apple Slices: Crunchy apples with sweet caramel create a delightful contrast, adding a fresh element that enhances the overall dining experience.
-
Crispy Baked Chicken Wings: These flavorful wings provide a savory balance to the sweetness of the Halloween Lush, making them a must-try appetizer.
-
Spooky Green Salad: Tossed with seasonal veggies and a tangy dressing, this salad adds a fresh, colorful contrast to the richer flavors of your dessert.
-
Hot Apple Cider: This warm, spiced beverage deepens the cozy atmosphere of your Halloween gathering and is a comforting complement to the layers in Halloween Lush.
-
Chocolate Chip Cookies: A timeless classic, these chewy cookies bring a familiar sweetness to the table, resonating with both children and adults alike.
Think of these pairings as harmonious note to your festive melody, creating an unforgettable meal that will have everyone raving about your Halloween festivities!
How to Store and Freeze Halloween Lush
Fridge: Store any leftovers in an airtight container in the refrigerator for up to 3-4 days. This helps maintain the freshness and creamy layers of your Halloween Lush.
Freezer: Avoid freezing this dessert, as it can alter the texture and flavor upon thawing. The creamy layers may separate, losing that delightful bite.
Reheating: Since this is a no-bake dessert, there’s no need for reheating. Simply serve chilled straight from the fridge for the best taste.
Presentation: If accommodating larger gatherings, consider storing it in a larger dish with a lid to protect the layers from any fridge odors, ensuring your Halloween Lush stays fresh and festive!
Expert Tips for Halloween Lush Recipe
-
Softened Cream Cheese: Ensure cream cheese is at room temperature for easy blending; cold cream cheese can lead to lumps in your creamy layer.
-
Layering Technique: Use a rubber spatula to spread each layer evenly; this helps maintain the distinct layers without mixing the colors.
-
Chilling Time: Don’t rush the chilling process! Allow at least 4 hours for the layers to set properly; this enhances the texture of your Halloween Lush.
-
Gelatin Substitution: Feel free to mix and match flavors—try lemon or cherry gelatin for a fun twist. But avoid any substitutes that might affect texture negatively.
-
Storage Reminder: Keep leftovers in an airtight container in the refrigerator for up to 3-4 days to maintain freshness and flavor—trust me, it tastes even better the next day!
Halloween Lush Recipe Variations
Feel free to get creative with your Halloween Lush and explore these fun twists to make this dessert even more unique!
-
Dairy-Free: Substitute cream cheese and whipped topping with dairy-free alternatives for a lactose-free delight without losing creaminess.
-
Flavorful Gelatin: Swap orange gelatin for strawberry or raspberry to achieve a vibrant, fruity twist that adds a surprise flavor layer.
-
Cake-like Texture: Add an extra layer of crushed cake or brownies in between the layers for a more textured, indulgent dessert experience.
-
Nutty Crust: For a crunchy surprise, mix chopped nuts or crushed pretzels into the chocolate sandwich cookie crust for a delightful salty-sweet contrast.
-
Chocolate Lovers: Replace vanilla pudding with chocolate instant pudding for a richer taste; it’ll create an indulgent twist that chocolate lovers will adore.
-
Harvest Spice: Incorporate pumpkin pie spice into the cream cheese layer for a seasonal flavor that harmonizes beautifully with the festive theme.
-
Extra Crunch: Layer in your favorite candy pieces like crushed candy corn or M&M’s between the pudding and cream cheese layers to invite a sweet crunch.
-
Fun Sprinkles: Use different seasonal sprinkles, like ghost or pumpkin shapes, to switch up the festive flair of your Halloween Lush.
With these variations, your Halloween Lush can be as adaptable as your imagination, bringing something new to your festive gatherings! If you’re looking for other delicious treats, check out our Baked Crunchy Hot chicken or indulge in some White Chocolate Halloween goodies!
Halloween Lush Recipe FAQs
What type of cookies should I use for the crust?
Absolutely! For the crust, chocolate sandwich cookies work beautifully due to their richness and crunch. If you’re looking for a change, graham cracker crumbs or even gingersnap cookies can provide a delightful twist on flavors and textures.
How should I store leftover Halloween Lush?
Store any leftovers in an airtight container in the refrigerator for up to 3-4 days. Make sure it’s tightly sealed to keep the layers fresh and prevent them from absorbing any fridge odors. This dessert tastes even better the next day as the flavors meld together!
Can I freeze Halloween Lush?
No, it’s best to avoid freezing this dessert. Freezing can alter the texture and flavor, leading to separated layers upon thawing. Stick to refrigerating it to maintain that creamy, luscious taste you expect!
What if my cream cheese layer isn’t smooth?
If your cream cheese isn’t blending smoothly, it might be too cold. Ensure it’s at room temperature beforehand; this should take about 30 minutes out of the fridge. Using an electric mixer can help blend it evenly. If lumps persist, try mixing it longer or using a food processor for a super smooth finish!
Are there any dietary considerations for Halloween Lush?
Yes, if you have any concerns about allergies, this recipe can be adjusted. Use gluten-free cookies for those avoiding gluten, and opt for dairy-free whipped topping and cream cheese if lactose intolerant. Just be mindful of labels to ensure all ingredients meet your dietary needs!
Delicious Halloween Lush Recipe: No-Bake Festive Delight
Ingredients
Equipment
Method
- Crush chocolate sandwich cookies in a food processor until fine crumbs. Mix with melted butter and press into a 9x13 dish.
- Whisk orange gelatin and boiling water until dissolved. Let cool slightly.
- Combine vanilla pudding with cold milk. Whisk until thickened, then stir in orange gelatin.
- Beat cream cheese and powdered sugar until smooth. Fold in whipped topping and food coloring, then spread over the crust.
- Pour the pudding mixture over the cream cheese layer, spreading gently without disturbing it.
- Mix remaining whipped topping with purple food coloring and spread over the orange layer. Top with sprinkles.
- Cover and refrigerate for at least 4 hours until set. Slice into squares and serve chilled.
Leave a Reply