
As I stood in my kitchen, the sweet aroma of ripe bananas filled the air, transporting me straight to my grandmother’s house in the South. Those cozy afternoons, spent savoring her Classic Homemade Banana Pudding, were some of my fondest memories. This delightful dessert is a true gem of comfort food, featuring creamy, made-from-scratch pudding layered with fresh bananas and crunchy vanilla wafers. With just a few simple ingredients and quick prep time, you’ll be ready to impress family and friends alike. Trust me, there’s something undeniably magical about enjoying a dessert that not only tastes homemade but also conjures a sense of nostalgia with every spoonful. How could you resist giving this classic a try?
Why Make Homemade Banana Pudding?
Comforting, Nostalgic Experience: Each bite is a delicious journey back to simpler times, reminiscent of family gatherings and cherished moments.
Simple Ingredients: With everyday kitchen staples like ripe bananas and vanilla wafers, you can whip up this classic dessert without any fuss.
Easily Customizable: Whether you prefer using graham crackers or a non-dairy milk alternative, this recipe adapts to your taste and dietary preferences!
Crowd-Pleasing Delight: Serve it at your next gathering, and watch as everyone dives into this creamy, flavorful dish—they won’t be able to resist!
For a refreshing fruity twist, consider pairing this dessert with Strawberry Banana Pudding. You’ll fall in love with its rich, smooth texture!
Homemade Banana Pudding Ingredients
• Get ready to whip up a classic treat with these simple ingredients!
For the Pudding
- Sugar – Provides sweetness to balance the flavors; feel free to substitute with brown sugar for a deeper taste.
- Flour – Acts as a thickening agent for a smooth texture; all-purpose flour works best in this recipe.
- Salt – Enhances overall flavor without making it salty; just a pinch goes a long way!
- Milk – The creamy base for your pudding; any milk variety, including non-dairy options, can be used.
- Eggs – Add richness and help thicken the pudding; whole eggs are preferred for the best results.
- Vanilla Extract – Offers flavor enhancement; opt for pure vanilla extract for a richer taste.
For the Layers
- Vanilla Wafers – Create structure and a delightful crunch in your dessert; about 8 oz is ideal, but consider graham crackers or Biscoff cookies as alternatives.
- Bananas – Vital for adding flavor and texture; be sure to use 4 fresh, ripe bananas, sliced for the perfect balance.
With these ingredients in hand, you’re just moments away from creating your very own Homemade Banana Pudding! It’s the perfect way to bring a taste of nostalgia back into your kitchen.
Step‑by‑Step Instructions for Classic Homemade Banana Pudding
Step 1: Prepare the Pudding Base
In a medium saucepan over medium heat, whisk together ¾ cup sugar, ⅓ cup flour, and a pinch of salt. Gradually pour in 4 cups of milk, whisking continuously to prevent lumps. Keep stirring for about 10 minutes until the mixture thickens and begins to bubble gently, signaling it’s ready for the next step.
Step 2: Temper the Eggs
In a separate bowl, whisk together 3 large eggs until smooth. Slowly ladle about 1 cup of the hot pudding mixture into the eggs, stirring constantly to temper them. This step is crucial to avoid scrambling the eggs. Once combined, return the tempered egg mixture to the saucepan and mix well.
Step 3: Final Pudding Cook
Reduce the heat to low and cook the pudding for another 2 minutes, stirring gently until it thickens further and bubbles softly. You’ll know it’s done when it coats the back of a spoon. Remove from heat and stir in 1 teaspoon of pure vanilla extract for that signature flavor.
Step 4: Cool the Pudding
Allow the pudding to cool for about 15 minutes, stirring occasionally. This cooling phase is important as it helps prevent the vanilla wafers from getting too soggy when layered. The pudding should still be warm as you prepare for layering, maintaining a creamy consistency.
Step 5: Layer the Ingredients
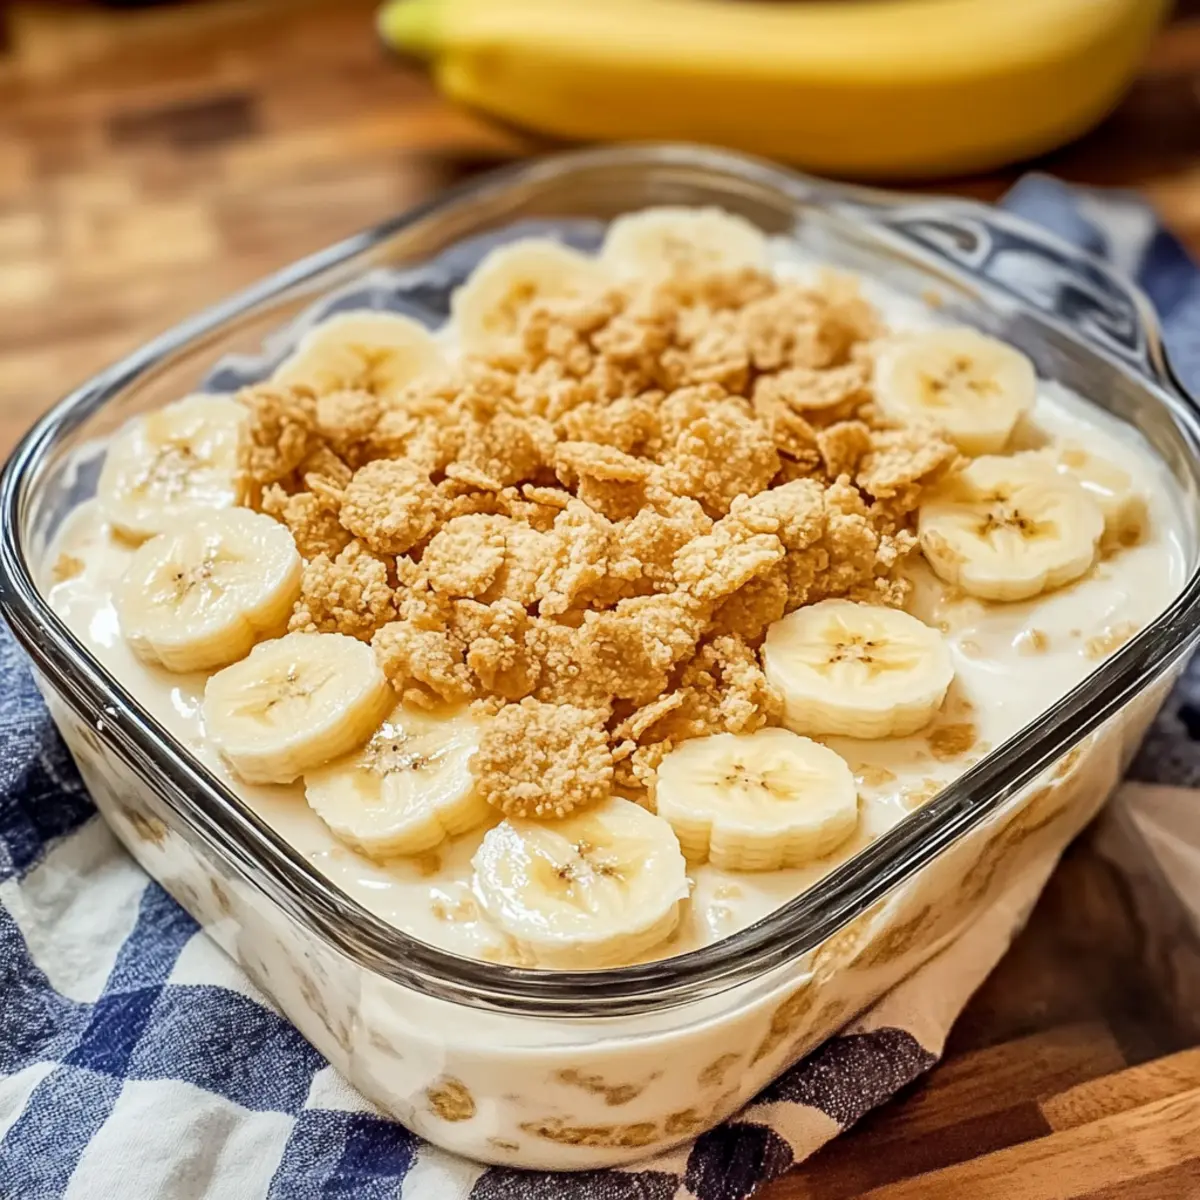
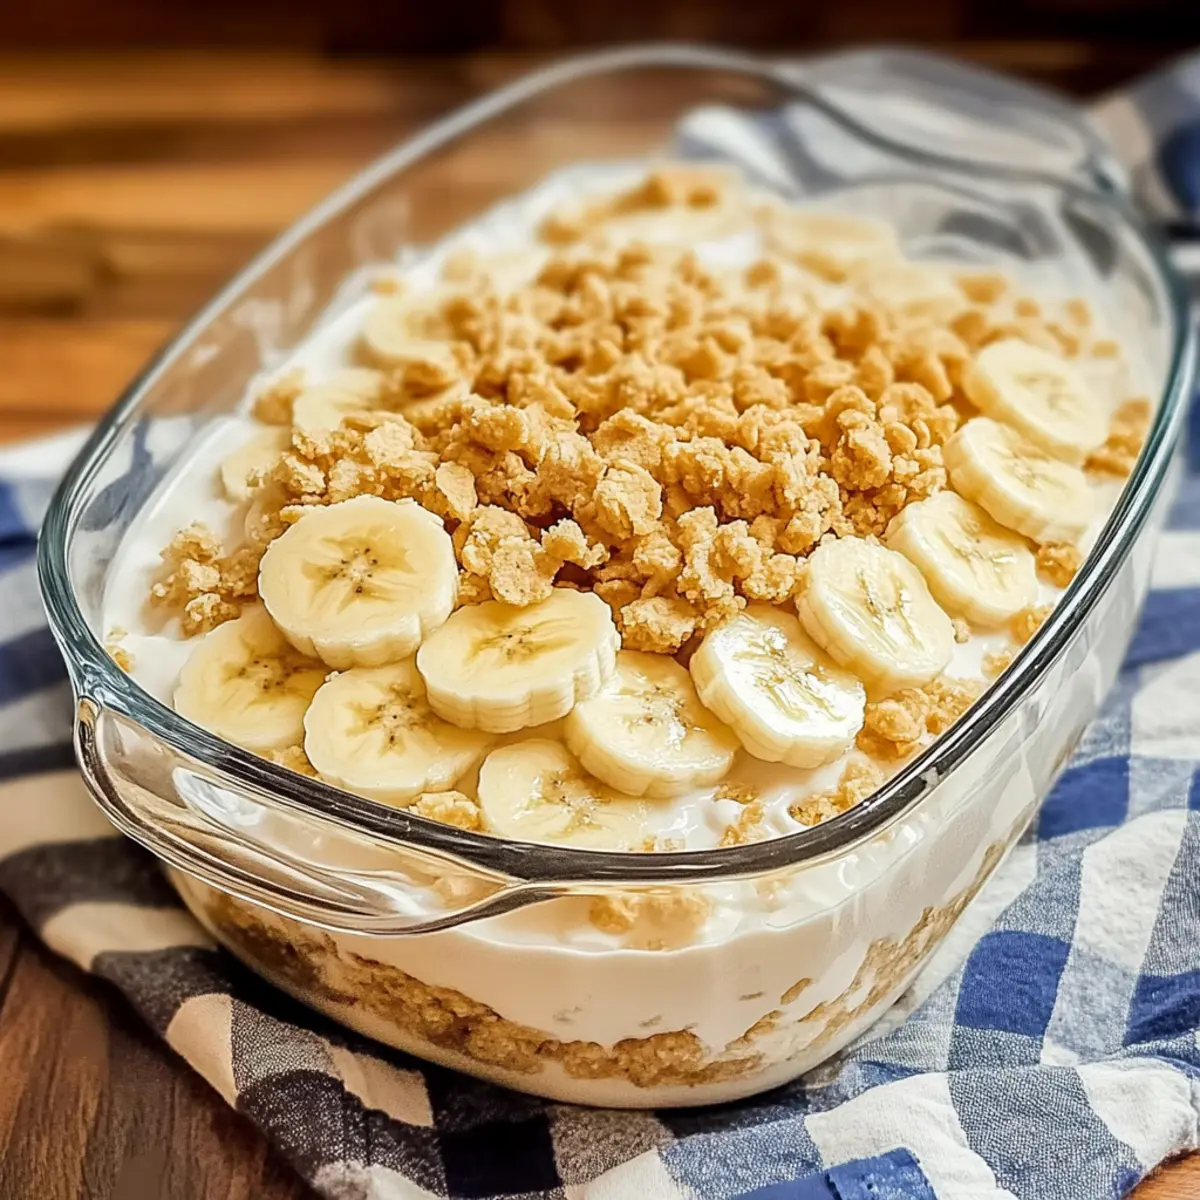
In an 8-inch square dish, start by placing half of the vanilla wafers at the bottom. Next, layer half of the sliced bananas evenly over the wafers. Pour half of the warm vanilla pudding over the layers, spreading it gently to cover all the bananas and wafers completely.
Step 6: Add More Layers
Repeat the layering process by adding the remaining sliced bananas on top of the pudding. Then, pour the rest of the pudding over this banana layer, ensuring it is evenly distributed. This builds the delightful tiers that make your Classic Homemade Banana Pudding irresistible.
Step 7: Chill Properly
Cover the dish tightly with plastic wrap and refrigerate for at least 4 hours, although overnight is best for flavor development and texture. This chilling time allows the flavors to meld and gives the pudding a nice, set consistency that makes serving easier.
Step 8: Garnish Before Serving
Just before serving, crush the remaining vanilla wafers and sprinkle them generously over the top of the pudding for added texture and crunch. This last touch not only enhances the presentation, but it also gives that classic banana pudding feel every family craves.
Homemade Banana Pudding Variations
Feel free to let your creativity shine and customize this delicious dessert to your liking!
- Graham Crackers: Swap out the vanilla wafers for crunchy graham crackers to add a delightful twist to the texture.
- Biscoff Cookies: Replace vanilla wafers with Biscoff cookies for a warm, spiced flavor that elevates the pudding to new heights.
- Non-Dairy: Use almond, coconut, or oat milk instead of regular milk to make this dessert vegan-friendly and perfect for lactose-intolerant guests.
- Sugar Substitutes: Try coconut sugar or agave syrup for a more wholesome sweetness that doesn’t compromise on taste.
- Nutty Crunch: Introduce crushed nuts like pecans or walnuts either in the layers or as a topping for a satisfying crunch.
To explore more banana-infused flavors, consider making Baked Banana Oatmeal Bars for breakfast or as a snack! You can also try out delicious Banana Oatmeal Bars that are perfect for on-the-go energy.
- Tropical Twist: Add shredded coconut and a little pineapple for a tropical flair that brings a whole new dimension of flavor.
- Spiced Flavor: Sprinkle in a dash of cinnamon or nutmeg to warm up the dish; this subtle spice enhances the pudding beautifully.
With these variations, your Homemade Banana Pudding can be a truly unique treat every time you make it!
How to Store and Freeze Homemade Banana Pudding
Fridge: Store your Homemade Banana Pudding covered in the refrigerator for up to 4 days. This keeps it fresh and allows the flavors to blend beautifully.
Freezer: It’s best not to freeze banana pudding as the texture may change when thawed. If necessary, store it in an airtight container for up to 2 months, but expect a softer consistency.
Prevent Browning: To avoid bananas from browning, add them just before serving. This keeps the pudding looking vibrant and appealing!
Reheating: If you need to reheat any leftovers, gently warm them in the microwave for a few seconds, stirring to maintain texture, but avoid overheating.
Make Ahead Options
These Classic Homemade Banana Pudding layers can easily be prepped in advance, saving you precious time on busy weeknights! You can make the pudding base up to 24 hours ahead, allowing the flavors to deepen as they chill. Simply follow the initial steps to prepare the pudding, then cool it for about 15 minutes before assembling (this prevents the vanilla wafers from becoming soggy). After layering the wafers and sliced bananas, cover the dish tightly with plastic wrap and refrigerate. For best results, add banana slices just before serving to keep them fresh and vibrant. With a little prep ahead, you’ll enjoy a delightful dessert that’s just as delicious as if made the same day!
What to Serve with Classic Homemade Banana Pudding
Bring a comforting touch to your meal with delightful sides that perfectly complement this creamy dessert.
-
Creamy Whipped Cream: A dollop of freshly made whipped cream adds a light, fluffy texture, enhancing the richness of the pudding.
-
Fresh Berry Medley: Bright, tart berries like strawberries and blueberries balance the sweetness of the banana pudding, adding a fresh burst of flavor.
-
Vanilla Ice Cream: The classic pairing of smooth vanilla ice cream melts beautifully with the warm pudding, creating a luscious combination.
-
Chocolate Chip Cookies: Chewy chocolate chip cookies provide a delicious contrast in texture, turning dessert into a delightful cookie and pudding pairing.
-
Peach Cobbler: A warm, spiced peach cobbler celebrates Southern flavors alongside your banana pudding, making for a comforting, nostalgic spread.
-
Mint Iced Tea: An aromatic glass of mint iced tea refreshes the palate and adds a delightful herbal note to your dessert experience.
-
Caramel Sauce Drizzle: A bit of warm caramel sauce drizzled over the banana pudding elevates its sweetness, offering an indulgent twist that will be hard to resist.
Pair these options with your Homemade Banana Pudding, and you’ll be set for a delightful gathering that all will adore!
Expert Tips for Homemade Banana Pudding
- Cool Before Layering: Allow the pudding to cool before layering with vanilla wafers to maintain their delightful crunch; soggy wafers can ruin the texture.
- Prevent Brown Bananas: To keep bananas fresh, add them right before serving. This avoids browning and keeps the presentation vibrant.
- Don’t Rush Tempering: When tempering the eggs, gradually incorporate the hot pudding to prevent scrambling; this step is key to a creamy homemade banana pudding.
- Chill for the Best Flavor: For optimal taste, refrigerate the pudding overnight; it allows the flavors to meld beautifully and ensures a perfect set.
- Crush Wafers at the End: Crush remaining vanilla wafers just before serving for a crunchy topping; this adds a lovely contrast to the creamy layers below.

Classic Homemade Banana Pudding Recipe FAQs
How do I choose the best bananas for this recipe?
Absolutely! Look for bananas that are ripe but not overly soft; they should have a few brown speckles without dark spots all over. This ensures optimal sweetness and flavor for your Homemade Banana Pudding.
How should I store leftover banana pudding?
To keep your Homemade Banana Pudding fresh, cover it tightly with plastic wrap or place it in an airtight container. It can be stored in the refrigerator for up to 4 days. This allows the flavors to meld beautifully, giving you a delightful treat each time!
Can I freeze banana pudding?
I recommend against freezing Homemade Banana Pudding. However, if necessary, place it in an airtight container and freeze for up to 2 months. Just keep in mind that the texture may change upon thawing, resulting in a softer consistency. When you’re ready to enjoy, let it thaw in the refrigerator overnight.
What happens if my pudding is too runny?
Very! If your pudding doesn’t thicken as expected, ensure you’ve cooked it long enough after adding the eggs. It should bubble gently for at least 2 minutes—this helps it set correctly. If it’s still runny, you can return it to the heat for a few more minutes, stirring continuously, until thickened.
Can I make this recipe dairy-free?
Absolutely! Substitute the regular milk with any non-dairy option, like almond or coconut milk, for a delicious dairy-free version of your Homemade Banana Pudding. Just be sure to check the consistency while cooking, as some non-dairy milks may require slight adjustments.
What is the best way to prevent the bananas from browning?
To avoid browning, slice the bananas and layer them just before serving. Covering the pudding tightly after it’s prepared will help protect the layers from air exposure. This not only maintains freshness but also keeps your dessert looking vibrant and appetizing!

Deliciously Creamy Homemade Banana Pudding You’ll Love
Ingredients
Equipment
Method
- In a medium saucepan over medium heat, whisk together ¾ cup sugar, ⅓ cup flour, and a pinch of salt. Gradually pour in 4 cups of milk, whisking continuously to prevent lumps. Keep stirring for about 10 minutes until the mixture thickens and begins to bubble gently, signaling it’s ready for the next step.
- In a separate bowl, whisk together 3 large eggs until smooth. Slowly ladle about 1 cup of the hot pudding mixture into the eggs, stirring constantly to temper them. This step is crucial to avoid scrambling the eggs. Once combined, return the tempered egg mixture to the saucepan and mix well.
- Reduce the heat to low and cook the pudding for another 2 minutes, stirring gently until it thickens further and bubbles softly. You’ll know it's done when it coats the back of a spoon. Remove from heat and stir in 1 teaspoon of pure vanilla extract for that signature flavor.
- Allow the pudding to cool for about 15 minutes, stirring occasionally. This cooling phase is important as it helps prevent the vanilla wafers from getting too soggy when layered.
- In an 8-inch square dish, start by placing half of the vanilla wafers at the bottom. Next, layer half of the sliced bananas evenly over the wafers. Pour half of the warm vanilla pudding over the layers, spreading it gently to cover all the bananas and wafers completely.
- Repeat the layering process by adding the remaining sliced bananas on top of the pudding. Then, pour the rest of the pudding over this banana layer, ensuring it is evenly distributed.
- Cover the dish tightly with plastic wrap and refrigerate for at least 4 hours, although overnight is best for flavor development and texture.
- Just before serving, crush the remaining vanilla wafers and sprinkle them generously over the top of the pudding for added texture and crunch.
Leave a Reply