
As the crisp autumn air settles in, a tantalizing treat emerges from the kitchen, inviting you to savor the season. These No-Bake Pumpkin Patch Dirt Cups are not just desserts; they are playful wonders that capture the spirit of fall and the joy of Halloween festivities. Imagine creamy layers of pumpkin and chocolate pudding, artfully tucked beneath a mound of crushed Oreos, resembling dark soil in a whimsical garden. Beyond their charming presentation, these Pumpkin Patch Dirt Cups are an absolute breeze to whip up, making them perfect for busy weeknights or spontaneous gatherings. Plus, they bring smiles to faces of all ages, allowing you to share a sweet moment with friends and family that’s gently indulgent yet easy to prepare. Ready to dig into the fun? Let’s make some delicious autumn magic together!

Why Are Pumpkin Patch Dirt Cups So Enjoyable?
Playful Presentation: These delightful cups mimic a mini garden, complete with crushed Oreos as “dirt,” making them a hit at any Halloween gathering.
Easy to Make: With only a few simple ingredients, you can whip up these no-bake treats in no time, perfect for busy schedules.
Customization Galore: Feel free to replace ingredients and mix flavors; consider adding Pumpkin Cupcakes Brown or even some festive autumn sprinkles to cater to your family’s preferences!
Crowd-Pleaser: Whether you’re hosting a party or enjoying a cozy family night, these cups bring smiles to both kids and adults alike.
Seasonal Flavor: The combination of pumpkin and chocolate delivers a deliciously rich taste that celebrates the essence of fall in every bite.
Pumpkin Patch Dirt Cups Ingredients
For the Puddings
• Instant Chocolate Pudding Mix – This is key for a rich, creamy layer; you can substitute it with homemade chocolate pudding for a personal touch.
• Instant Vanilla Pudding Mix or Pumpkin Spice Flavor – Adds a sweet, delightful layer; if you’re in a pinch, mix vanilla pudding with canned pumpkin puree and pumpkin pie spice for a quick solution.
• Canned Pumpkin Puree – Essential for that authentic pumpkin flavor; always opt for pure pumpkin puree, steering clear of pumpkin pie mix for the best results.
• Pumpkin Pie Spice – This spice blend elevates the fall flavor; if you don’t have it handy, use a mix of cinnamon, nutmeg, and ginger instead.
• Milk – Acts as the liquid hero for puddings; feel free to use whole, 2%, or dairy alternatives like almond or oat milk to suit your family’s taste.
• Whipped Topping – Provides a airy, creamy consistency; you can replace Cool Whip with homemade whipped cream or even dairy-free options for a lighter twist.
For the Crunchy Layers
• Crushed Oreos – Creates that “dirt” look and delightful texture; try using alternative cookies such as chocolate grahams for a unique flavor boost.
• Graham Crackers (optional) – Adds a sandy texture or can be mixed in with the Oreos; for those with dietary needs, gluten-free options are readily available.
For the Fun Decorations
• Gummy Worms – Add a playful, festive touch; easily swap these for any seasonal candy or Halloween gummies that catch your fancy.
• Candy Pumpkins – Elevates the visual appeal of your dessert; use any seasonal candy to bring a smile to everyone’s faces.
For Serving
• Small Clear Plastic Cups or Glass Jars – To beautifully showcase your layered creation; opt for clear containers to let those glorious layers shine through!
Let’s embark on this delightful journey with these Pumpkin Patch Dirt Cups, where every bite celebrates the warmth and whimsy of autumn!
Step‑by‑Step Instructions for Pumpkin Patch Dirt Cups
Step 1: Prepare Chocolate Pudding
In a mixing bowl, whisk together the instant chocolate pudding mix with 2 cups of milk for about 2 minutes until fully combined. Let the mixture sit for 5 to 10 minutes in the refrigerator until it sets and becomes thick. This rich layer will serve as the foundation for your delightful Pumpkin Patch Dirt Cups.
Step 2: Prepare Pumpkin Pudding
In a separate bowl, combine the instant vanilla pudding mix (or pumpkin spice flavor) with another 2 cups of milk. Stir in the canned pumpkin puree and pumpkin pie spice until the mixture is smooth and creamy, about 2 to 3 minutes. This spiced pumpkin layer adds that cozy autumn flavor to your dessert.
Step 3: Fold in Whipped Topping
Gently fold the whipped topping into the pumpkin pudding mixture using a spatula. This will lighten the texture and make it airy and fluffy. Aim for mixed consistency without over-mixing, allowing the fluffy whipped topping to maintain its volume. This creamy layer will perfectly complement the chocolate layer in your Pumpkin Patch Dirt Cups.
Step 4: Layer Pudding
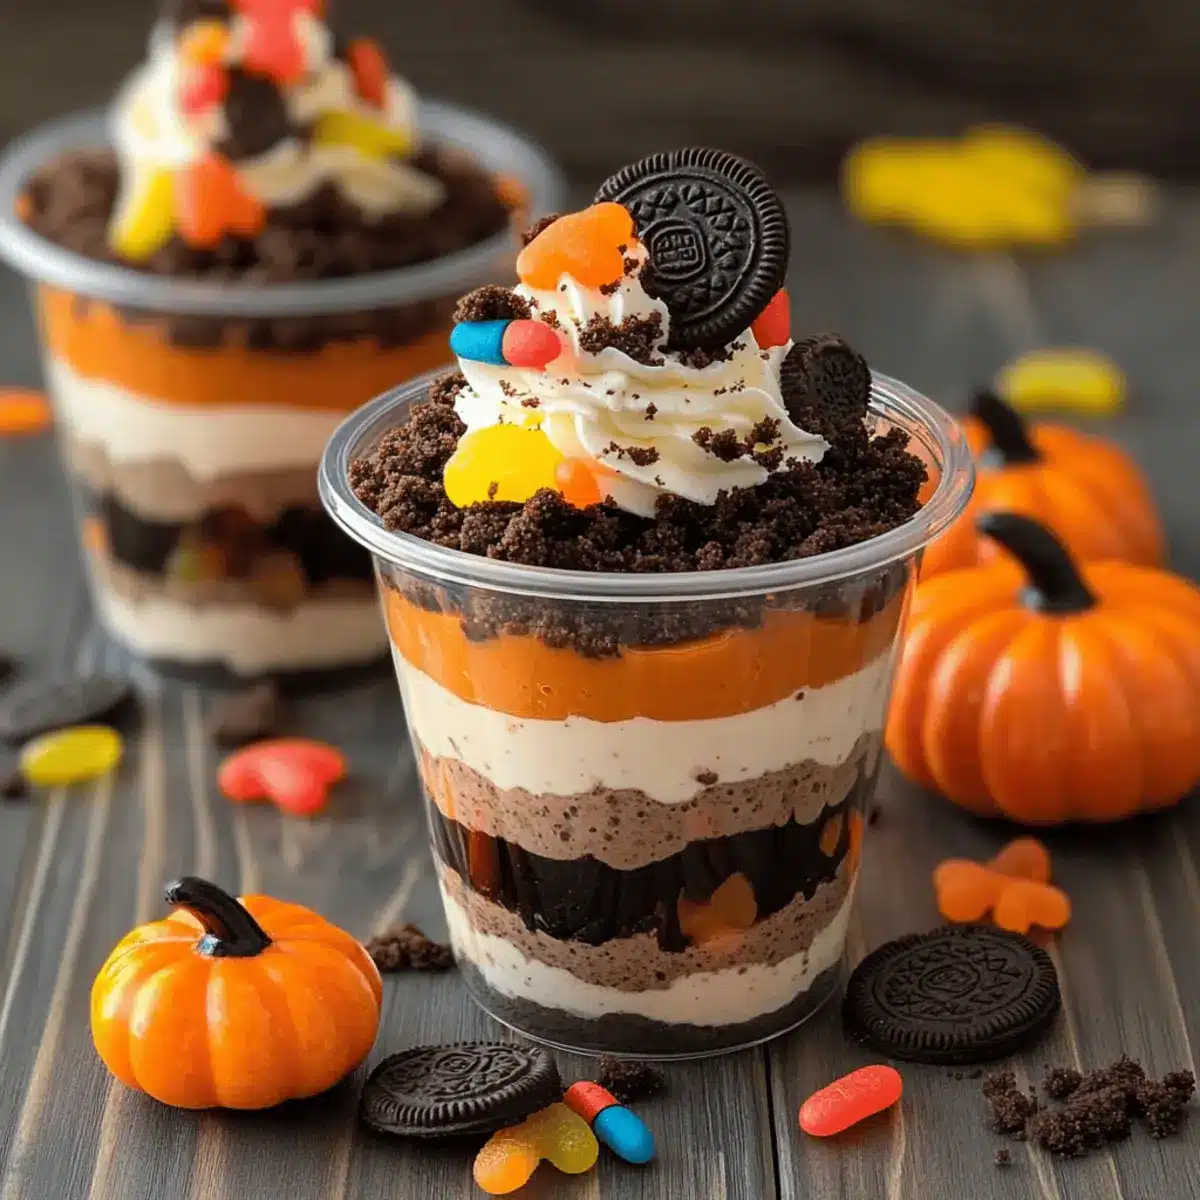
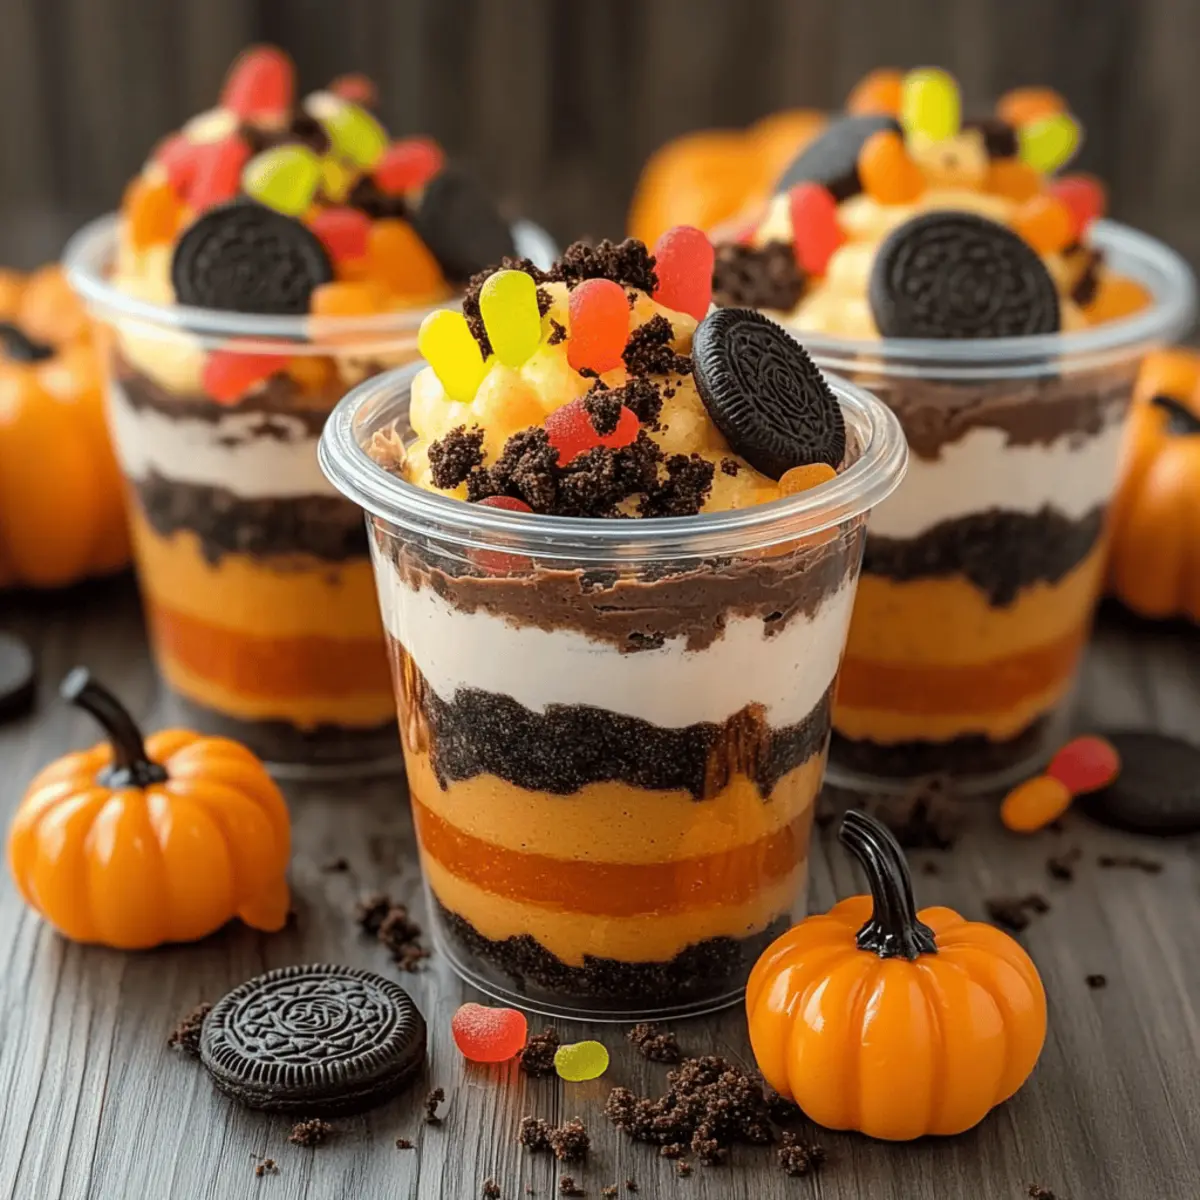
Start assembling your Pumpkin Patch Dirt Cups by spooning a layer of chocolate pudding into the bottom of small clear plastic cups or glass jars. Use about 1/4 to 1/3 of the cup for this layer. Once the chocolate base is set, sprinkle a generous layer of crushed Oreos on top to create the “dirt” effect.
Step 5: Add Pumpkin Mixture
Carefully spoon the pumpkin pudding mixture over the Oreo layer, filling the cups to about three-quarters full. Take your time to spread it evenly, creating a beautiful contrast between the rich chocolate and the vibrant orange pumpkin layers. This layering is what makes your Pumpkin Patch Dirt Cups visually appealing.
Step 6: Top It Off
Finish off your cups by sprinkling more crushed Oreos or crushed graham crackers on top. Decorate each one with candy pumpkins, gummy worms, and festive sprinkles for that fun Halloween touch. This playful decoration invites everyone to dig into your delicious Pumpkin Patch Dirt Cups!
Step 7: Chill Before Serving
Refrigerate the assembled Pumpkin Patch Dirt Cups for at least 30 minutes. This chilling time helps the layers firm up and allows the flavors to meld together. When ready to serve, ensure your cups are cold, and enjoy the delightful treat with friends and family.
Expert Tips for Pumpkin Patch Dirt Cups
-
Layer Wisely: Make sure to distribute layers evenly for an inviting presentation. Start with chocolate pudding as the base for a solid foundation.
-
Keep It Cool: Always chill your cups for at least 30 minutes before serving. This helps maintain the structure of the Pumpkin Patch Dirt Cups and melds flavors beautifully.
-
Crush Oreos Easily: Speed up crushing Oreos by using a food processor or place them in a zip bag and gently pound with a rolling pin. This ensures consistent texture for your “dirt.”
-
Add Toppings Last: To avoid sogginess, decorate your cups with gummy worms and candy pumpkins just before serving, keeping them looking fresh and delightful.
-
Experiment with Flavors: Don’t hesitate to switch things up with flavored pudding mixes! Butterscotch or peanut butter can add a unique twist to your Pumpkin Patch Dirt Cups.
Make Ahead Options
These Pumpkin Patch Dirt Cups are ideal for meal prep, allowing you to enjoy their deliciousness without the last-minute rush! You can prepare the chocolate and pumpkin pudding layers up to 24 hours in advance. Simply mix the puddings as directed and store them separately in airtight containers in the refrigerator to maintain their creamy textures. While you can also crush the Oreos ahead of time, wait to assemble the cups until just before serving, as this will keep the “dirt” layer crisp and prevent sogginess. When you’re ready to serve, layer the puddings, add the crushed Oreos, and top with your favorite seasonal candies for an effortless and delightful treat that brings smiles to all!
Pumpkin Patch Dirt Cups Variations
Feel free to get creative and make these delightful cups your own with these fun twists and substitutions!
-
Flavor Swap: Use butterscotch or peanut butter puddings instead of chocolate for a unique flavor experience. This lovely change will delight your taste buds and offer a creamy indulgence.
-
Gluten-Free: Opt for gluten-free cookies and graham crackers if dietary restrictions are a concern. Everyone can join in on the fun without compromising taste or texture!
-
Dairy-Free Delight: Substitute dairy milk with almond or oat milk and use plant-based whipped topping. These adjustments allow you to enjoy the same creamy goodness without dairy ingredients.
-
Cocoa Crunch: Mix cocoa powder with crushed graham crackers to add an extra chocolatey flavor to your layers. This will elevate your dessert and make every spoonful a chocolate lover’s dream.
-
Seasonal Toppings: Top your cups with caramel sauce or chocolate drizzle for an irresistible finish. These sweet additions will add a touch of elegance and extra sweetness to your delightful dessert!
-
Fruit Infusions: Consider mix-ins like diced apples or pears for an extra layer of flavor and texture. This is a fun way to sneak in some fruitiness while keeping it seasonal.
-
Spiced Whipped Cream: Incorporate pumpkin spice into your whipped topping for an aromatic twist. This little detail adds warmth and brings that cozy fall vibe to each delightful bite.
Feel free to experiment and combine different variations as you please! And for more delicious fall-inspired treats, you might enjoy making Pumpkin Cupcakes Brown or some mouthwatering Apple Pumpkin Streusel. Enjoy crafting your perfect pumpkin patch creation!
What to Serve with Pumpkin Patch Dirt Cups?
Picture a cozy gathering filled with laughter and delicious scents, where sweet treats enhance the autumn spirit.
- Apple Cider: This warm, spiced beverage perfectly complements the cozy flavors of fall, making it an ideal drink alongside dessert.
- Caramel Apple Slices: Sweet, juicy apples drizzled with rich caramel create a crunchy contrast that pairs beautifully with the creamy cups.
- Savory Cheese Platter: Including a variety of cheeses adds an interesting savory note, balancing the sweetness of the Pumpkin Patch Dirt Cups.
- Gingerbread Cookies: The warm ginger and spice flavors echo the autumn essence, providing a festive treat to accompany your dessert.
- Pumpkin Spice Latte: This beloved fall beverage echoes the flavors of the cups, creating a harmonious experience of the season in each sip.
- Chocolate Bar: A simple chocolate bar brings in your favorite flavors and textures, allowing for a playful combination to nibble on alongside.
- Harvest Salad: A fresh salad with pears, walnuts, and a light vinaigrette adds a refreshing contrast to the rich sweetness of the dessert.
- Vanilla Ice Cream: Scoop a dollop of creamy vanilla ice cream on the side, harmonizing with the pumpkin flavors for a cool treat.
- Spiced Nuts: A crunchy mix of spiced nuts brings a satisfying texture that complements the creamy indulgence of the cups perfectly.
- Mini Pumpkin Muffins: These delightful little bites echo the same flavors while offering an easy, handheld treat for a sweet table display.
How to Store and Freeze Pumpkin Patch Dirt Cups
Fridge: Keep the assembled Pumpkin Patch Dirt Cups refrigerated for up to 3 days. Cover them with plastic wrap to maintain freshness.
Freezer: For longer storage, you can freeze the cups without toppings for up to 1 month. Just be sure to thaw them in the fridge before serving.
Reheating: These cups are best served cold; simply take them out of the fridge or freezer and enjoy as-is, without any reheating.
Serving Freshness: To keep the Oreo layer crunchy, add toppings like gummy worms and candy pumpkins right before serving, even if storing in the fridge.

Pumpkin Patch Dirt Cups Recipe FAQs
How do I select the best canned pumpkin puree for this recipe?
Absolutely! When choosing canned pumpkin puree, always look for labels that say “100% pumpkin” rather than “pumpkin pie mix,” which contains added sugars and spices. Check for a smooth texture without dark spots or signs of separation, which can indicate age. I often go with brands like Libby’s or Trader Joe’s for reliable quality.
How should I store leftover Pumpkin Patch Dirt Cups?
Very! To store your assembled Pumpkin Patch Dirt Cups, simply cover them with plastic wrap or transfer them to an airtight container. They will stay fresh in the refrigerator for up to 3 days. Just remember to keep the cookie layers separate if you prefer them crunchy!
Can I freeze Pumpkin Patch Dirt Cups for later?
Absolutely! You can freeze the cups without toppings for up to 1 month. To do this, prepare the cups as instructed, then cover them tightly with plastic wrap and foil. When you’re ready to enjoy them, thaw overnight in the fridge and add your gummy worms and candy decorations just before serving.
What do I do if my pudding layers aren’t setting properly?
If your pudding layers aren’t setting, it could be due to insufficient mixing or not following the recommended chilling time. Make sure to whisk the pudding mix thoroughly with milk for at least 2 minutes, then chill in the refrigerator for the suggested 5-10 minutes. For best results, prepare your cups the night before and let them firm up overnight.
Are there any allergy considerations I should keep in mind?
Very much so! For gluten allergies, opt for gluten-free Oreos and graham crackers. If there are dairy allergies, substitute the whipped topping with a dairy-free alternative like coconut whipped cream. Additionally, always check the labels of any candies you use to ensure they’re suitable for your guests.
How long can I keep these Pumpkin Patch Dirt Cups in the refrigerator?
You can store the cups in the fridge for up to 3 days, but for optimal flavor and texture, I recommend enjoying them within 2 days. Be sure to cover the cups well to avoid any absorption of other food odors from the fridge!
Delightful Pumpkin Patch Dirt Cups for a Festive Fall Treat
Ingredients
Equipment
Method
- In a mixing bowl, whisk together the instant chocolate pudding mix with 2 cups of milk for about 2 minutes. Let it sit in the refrigerator for 5 to 10 minutes until it sets.
- In a separate bowl, combine the instant vanilla pudding mix with another 2 cups of milk. Stir in the canned pumpkin puree and pumpkin pie spice until smooth.
- Gently fold in the whipped topping into the pumpkin pudding mixture.
- Start assembling by spooning a layer of chocolate pudding into the bottom of cups. Use about 1/4 to 1/3 of the cup for this layer, then top with crushed Oreos.
- Carefully spoon the pumpkin pudding mixture over the Oreo layer.
- Top with more crushed Oreos or crushed graham crackers, and decorate with gummy worms and candy pumpkins.
- Chill the assembled cups for at least 30 minutes before serving.
Leave a Reply