
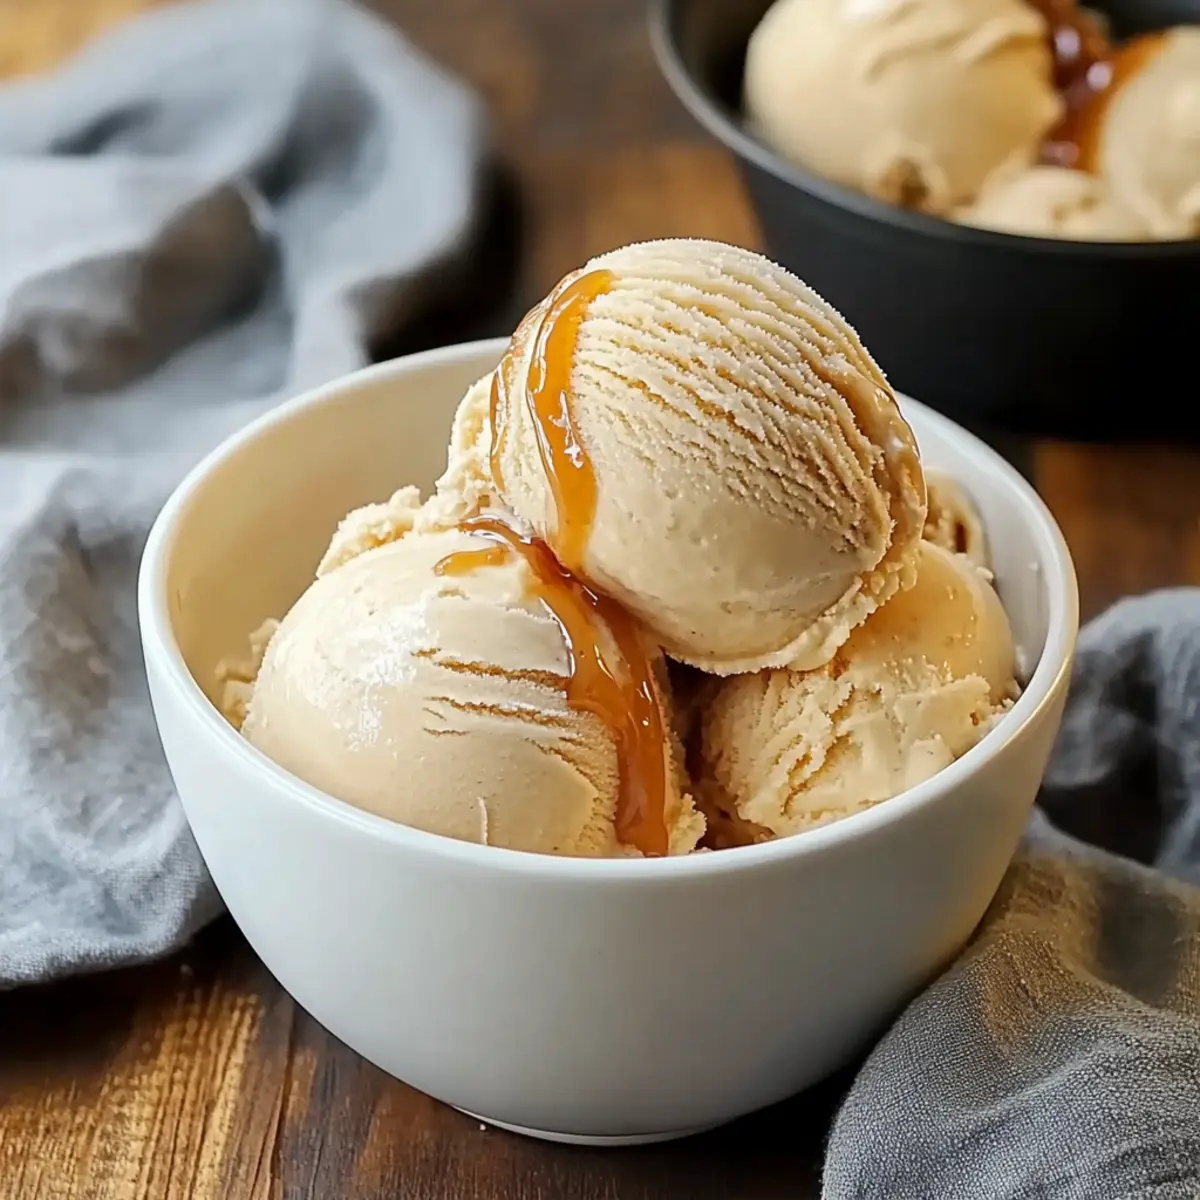
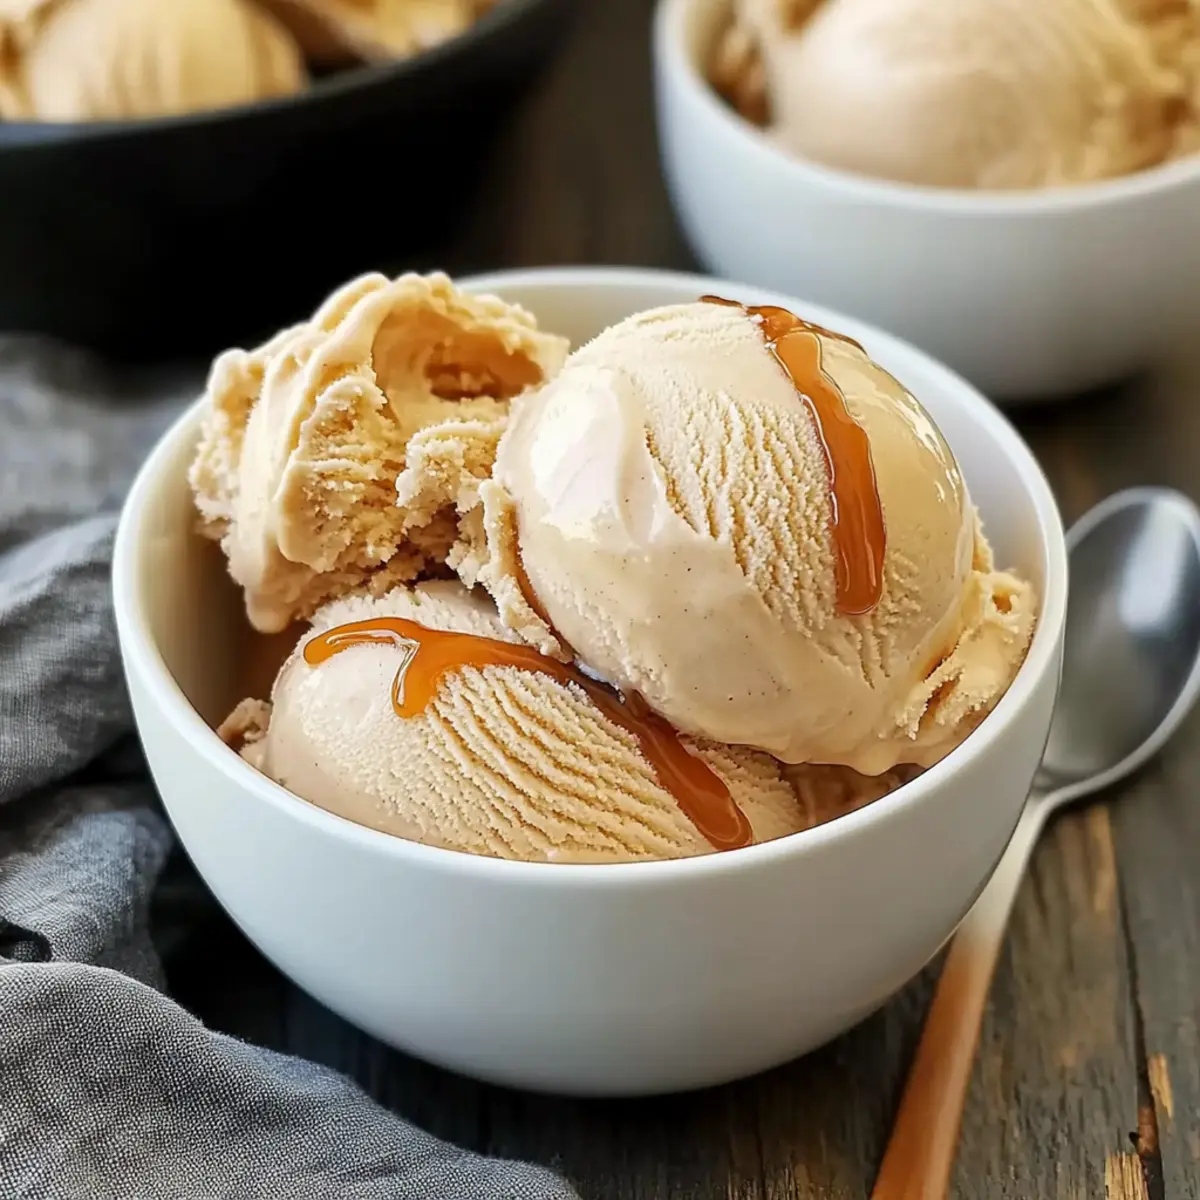
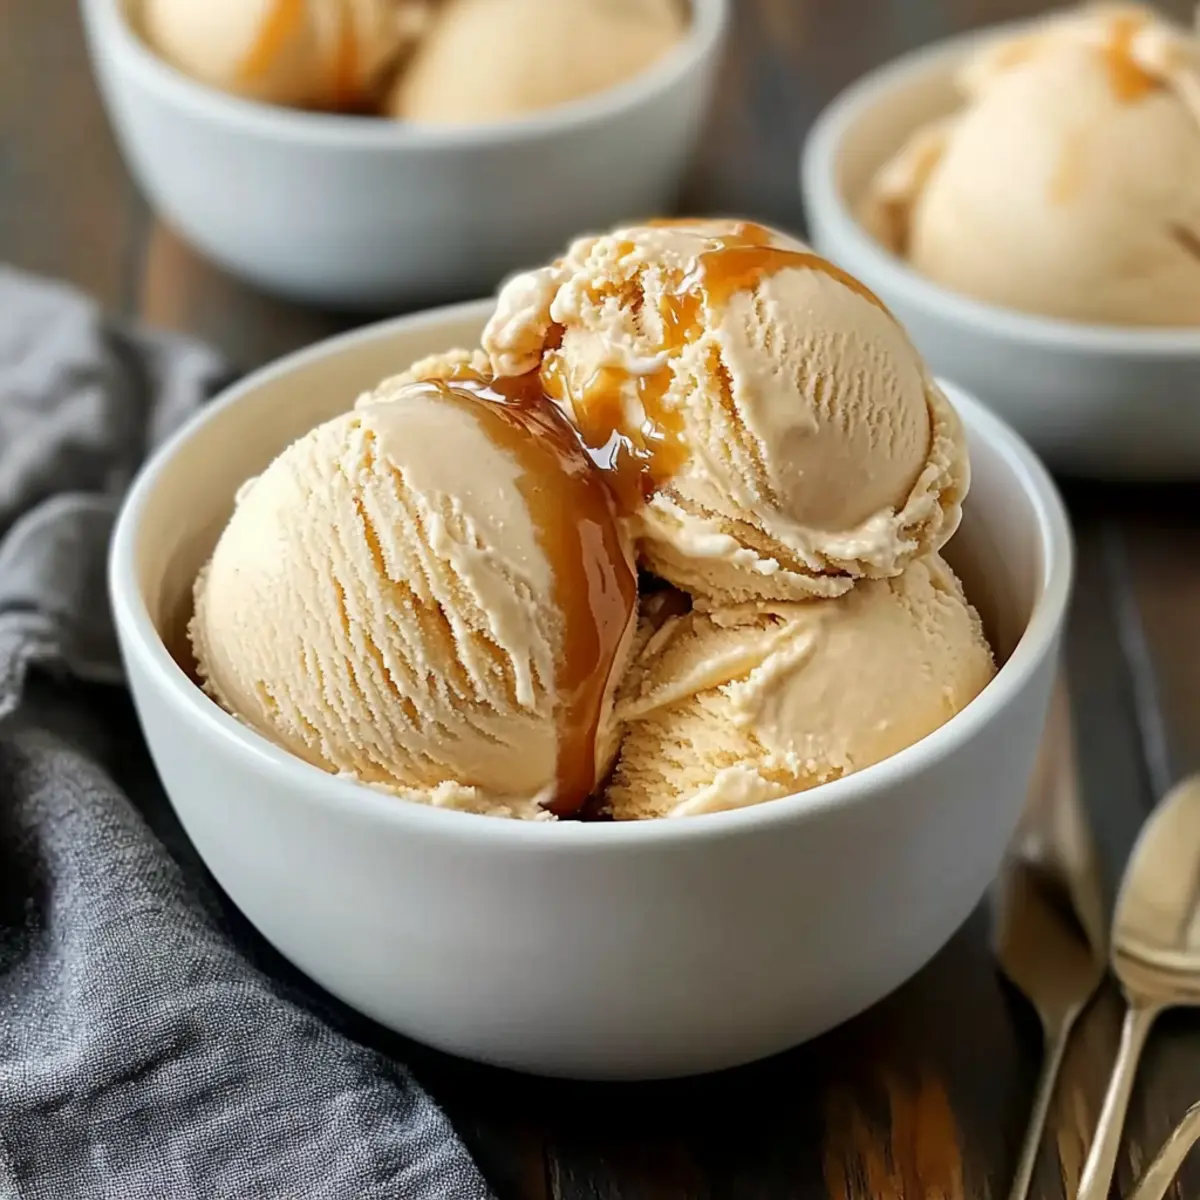
As the sun dips low in the sky, I can almost taste that irresistible combination of sweet and salty dancing on my tongue. The moment I whipped up this creamy Salted Caramel Ice Cream, it felt like I had unlocked the secret to happiness in a bowl! This homemade treat is not only a delightful way to cool off on warm afternoons but also a show-stopping dessert that will impress friends and family alike. With its luscious ribbons of rich, buttery caramel woven into a silky custard, it’s a sweet escape from the ordinary. Plus, this recipe is a breeze to make, even allowing for a dairy-free version if that’s more your style. Are you ready to embrace the magic of homemade ice cream? Let’s dive into this delightful creation together!
Why is Homemade Ice Cream Worth It?
Indulgent Flavor: This Salted Caramel Ice Cream is the epitome of sweet and salty bliss, combining rich caramel and creamy custard that makes each scoop a decadent delight.
Simple to Make: With just a few ingredients, you can easily transform your kitchen into an ice cream parlor, proving that homemade treats can rival any store-bought option.
Versatile Options: Feel free to explore variations, such as the dairy-free version or adding fun mix-ins like crushed pretzels to elevate the texture and flavor.
Perfect for Gatherings: Impress friends with this show-stopping dessert that’s sure to be a hit at summer parties or special occasions.
Timeless Treat: With its cultural roots in classic French desserts, this ice cream offers a touch of elegance while remaining accessible and familiar.
Get ready to savor a luxurious dessert that feels like a true indulgence, perfect for warm summer days or cozy nights alike!
Salted Caramel Ice Cream Ingredients
For the Salted Caramel Sauce
- Granulated Sugar – The key to caramelizing; for a richer taste, opt for light brown sugar.
- Butter – Adds richness to the caramel; you’ll love salted butter for an enhanced flavor.
- Heavy Cream – Gives a silky texture; coconut cream is a great dairy-free alternative.
- Salt – Elevates the sweetness of the caramel; use flaky sea salt for that perfect finishing touch.
For the Custard Base
- Whole Milk – Ensures creaminess; almond milk works if you prefer a lighter option.
- Egg Yolks – Essential for a luscious custard texture that deepens the flavor.
Enjoy making this delightful Salted Caramel Ice Cream!
Step‑by‑Step Instructions for Salted Caramel Ice Cream
Step 1: Make Salted Caramel Sauce
In a medium saucepan, heat 1 cup of granulated sugar over medium heat, stirring gently until it melts into a golden amber liquid, about 8-10 minutes. Once the sugar is fully melted, add 6 tablespoons of salted butter and whisk until melted, then slowly pour in 1 cup of heavy cream while continuing to stir. Remove from heat, add a pinch of flaky sea salt, and set aside to cool.
Step 2: Prepare Custard Base
In a mixing bowl, whisk together 4 large egg yolks and 3/4 cup of granulated sugar until creamy and pale, about 2-3 minutes. Meanwhile, in a saucepan, heat 2 cups of whole milk and 1 cup of heavy cream over medium heat until it begins to simmer. Gradually add the hot milk mixture to the egg yolks, whisking constantly to temper the eggs, then return everything to the saucepan and cook over low heat, stirring until thickened.
Step 3: Chill Custard
Once the custard has thickened and coats the back of a spoon (around 7-10 minutes of cooking), strain it through a fine-mesh sieve into a clean bowl to remove any cooked egg bits. Cover the surface with cling film to prevent a skin from forming, then refrigerate for at least 4 hours or overnight until completely chilled. This step is essential for achieving a creamy texture in your Salted Caramel Ice Cream.
Step 4: Churn Ice Cream
After chilling, pour the custard into your ice cream maker and churn according to the manufacturer’s instructions, typically about 20-25 minutes. During the last few minutes of churning, slowly drizzle in the cooled salted caramel sauce, allowing it to create luscious ribbons throughout the mixture. You’ll notice the ice cream thickening beautifully as it churns.
Step 5: Freeze
Once the Salted Caramel Ice Cream reaches a soft-serve consistency, transfer it to an airtight container. Smooth the top with a spatula and cover with a layer of cling film pressed against the surface to minimize ice crystal formation. Freeze for at least 4 hours or overnight to allow it to firm up perfectly before serving. Enjoy this delightful homemade treat!
Expert Tips for Salted Caramel Ice Cream
-
Chill Well: Make sure your custard is completely chilled before churning. This step is crucial for creating a smooth, creamy Salted Caramel Ice Cream without icy textures.
-
Avoid Ice Crystals: To prevent ice crystals from forming, store your ice cream in an airtight container. Press cling film directly onto the surface before sealing.
-
Caramel Consistency: If your salted caramel sauce hardens during cooling, gently reheat it over low heat until it becomes pourable again. This ensures a beautiful swirl in your ice cream.
-
Tempering Eggs: When adding hot milk to egg yolks, do it gradually while whisking continuously. This helps avoid scrambled eggs and ensures a smooth custard base.
-
Experiment with Mix-ins: Don’t hesitate to add fun ingredients like crushed pretzels or chocolate swirls to your Salted Caramel Ice Cream. They add delightful textures and flavors!
What to Serve with Salted Caramel Ice Cream
This delightful ice cream is more than just a dessert; it’s the perfect sweet ending to any meal, inviting you to indulge in a symphony of flavors.
-
Warm Chocolate Brownies: The fudgy texture of warm brownies perfectly complements the creaminess of salted caramel, creating a luscious contrast.
-
Baked Apples with Cinnamon: The warmth and spices from baked apples elevate the ice cream, offering a cozy flavor reminiscent of autumn evenings.
-
Coffee or Espresso: A fresh cup of coffee enhances the sweetness of the ice cream, making every sip and scoop a delightful experience.
-
Ginger Snap Cookies: These spicy, crunchy cookies create a delightful textural contrast, bringing out the caramel’s sweetness while adding a zesty kick.
-
Caramel Sauce Drizzle: For an extra indulgent touch, drizzle more salted caramel sauce on top for an irresistible sweet flourish that will have everyone asking for seconds.
-
Fresh Berries: The tartness of raspberries or strawberries cuts through the richness, refreshing your palate with every bite.
-
Chocolate Chip Cookies: The classic favorite offers a chewy, comforting addition that pairs beautifully with the cold, creamy texture of the ice cream.
-
Almond Milkshake: This cold drink provides a nutty twist, balancing the salt and sweetness while creating a fun contrast in consistency.
-
Sea Salted Pretzels: Their savory, crunchy elements provide a playful textural contrast, enhancing the delightful sweet and salty profile of the ice cream.
Salted Caramel Ice Cream Variations
Customizing your homemade ice cream can be a delightful adventure! Let your creativity flow as you explore these tasty twists and substitutions.
-
Dairy-Free: Use coconut milk and plant-based butter for a creamy, dairy-free treat that everyone’s sure to love.
-
Nutty Delight: Add crushed almonds or pecans to the mixture for a nutty crunch that adds fantastic texture and flavor.
-
Chocolate Swirls: Drizzle in melted chocolate while churning for a rich, chocolatey contrast that elevates the salted caramel experience.
-
Coffee Infusion: Stir in a shot of espresso or coffee extract to deepen the flavors of your salted caramel; coffee and caramel are a timeless match!
-
Minty Freshness: Add a hint of peppermint extract during churning for a refreshing twist that brightens this decadent ice cream.
-
No Ice Cream Maker: Freeze the custard in a shallow dish, stirring every 30 minutes to break up ice crystals until fully frozen for a delectable version without the machine.
-
Spicy Kick: Incorporate a pinch of cayenne pepper or cinnamon to introduce a warm heat that complements the sweetness of the caramel.
Explore these variations to find your perfect scoop, and if you’re looking for other delightful desserts, check out these Sweet Coconut Cream Pancakes next time you want a delicious breakfast!
How to Store and Freeze Salted Caramel Ice Cream
-
Fridge: Keep homemade Salted Caramel Ice Cream in the fridge for up to 3 days if you plan to serve it soon, but be aware it may lose its creamy texture.
-
Freezer: For longer storage, place the ice cream in an airtight container. It can last in the freezer for up to 2 weeks without significant loss of quality.
-
Wrapping: To minimize ice crystal formation, press a layer of cling film directly onto the ice cream surface before sealing the container.
-
Reheating: If the ice cream becomes too hard, let it sit at room temperature for about 10 minutes before scooping for the best texture.
Make Ahead Options
These Salted Caramel Ice Cream preparations are perfect for busy home cooks looking to save time! You can make the salted caramel sauce up to 3 days in advance; simply store it in an airtight container in the refrigerator. Additionally, the custard base can be prepared 24 hours ahead and kept chilled in the fridge for optimal results. When you’re ready to churn the ice cream, just pour the chilled custard into your ice cream maker and churn as directed, adding the caramel sauce in the last few minutes. This prep approach ensures that every scoop is just as delicious as the day you made it, transforming your busy weeknights into an effortless treat for the whole family!
Salted Caramel Ice Cream Recipe FAQs
How do I choose ripe ingredients for my Salted Caramel Ice Cream?
Absolutely! While this recipe mainly relies on pantry staples, using high-quality ingredients enhances the flavor. Opt for fresh, organic eggs for a richer custard and use unsalted butter to control the saltiness in the caramel. If substituting for a dairy-free version, ensure your coconut cream is well-quality and organic for the best results.
How should I store the Salted Caramel Ice Cream?
For optimal texture and flavor, store your homemade Salted Caramel Ice Cream in an airtight container in the freezer. It will remain at its best for about 2 weeks. For longer storage, press a layer of cling film directly onto the ice cream’s surface before sealing the container to help prevent ice crystals from forming.
Can I freeze the Salted Caramel Ice Cream? If so, how?
Very! Once you have churned the ice cream, transfer it to an airtight container and smooth out the top. Seal it tightly and freeze for at least 4 hours or overnight. If you want to enjoy it later, it can be frozen for up to 3 months. Just remember to let it soften at room temperature for about 10 minutes before scooping for the best consistency!
What should I do if my caramel sauce hardens?
No worries! If your salted caramel sauce hardens as it cools, gently reheat it over low heat while stirring until it becomes pourable again. This will allow you to easily swirl it into your ice cream. Make sure to let it cool slightly before adding it to the custard mixture to ensure it blends well without melting the ice cream.
Are there any dietary considerations for the Salted Caramel Ice Cream?
Definitely! If you’re making this for someone with dairy allergies, consider using coconut milk and dairy-free butter as substitutes to keep it delicious yet safe for them. Always check labels for allergens if serving to guests with specific dietary restrictions. The more the merrier, so everyone can enjoy this delightful treat!
How can I avoid ice crystals in my homemade ice cream?
To prevent ice crystals, make sure your custard is well-chilled before churning it in the ice cream maker. After churning, store it in an airtight container and press cling film against the surface. This minimizes air exposure, keeping your Salted Caramel Ice Cream creamy and smooth. Stir thoroughly when you check on it occasionally during freezing to maintain that luscious texture!
Decadent Salted Caramel Ice Cream for Sweet Summer Bliss
Ingredients
Equipment
Method
- In a medium saucepan, heat the sugar over medium heat, stirring until it melts into a golden amber liquid, about 8-10 minutes. Add the butter and whisk until melted, then pour in the heavy cream while stirring. Remove from heat, add flaky sea salt, and set aside to cool.

- In a mixing bowl, whisk together the egg yolks and granulated sugar until creamy and pale, about 2-3 minutes. Heat the whole milk and heavy cream in a saucepan over medium heat until it simmers. Gradually add the hot milk mixture to the egg yolks, whisking constantly, then return to the saucepan and cook over low heat until thickened.
- Strain the thickened custard through a fine-mesh sieve into a clean bowl to remove any cooked egg bits. Cover with cling film and refrigerate for at least 4 hours or overnight until completely chilled.
- Pour the chilled custard into the ice cream maker and churn according to manufacturer’s instructions, about 20-25 minutes. Drizzle in the cooled salted caramel sauce during the last few minutes of churning.
- Transfer the ice cream to an airtight container. Smooth the top, cover with cling film, and freeze for at least 4 hours or overnight to firm up before serving.
Leave a Reply